The numbers on a drill usually control clutch torque, helping you drive screws without sinking them too deep or damaging the material.
If you have ever picked up a cordless drill to hang shelves, build a deck, or fix a loose cabinet handle in your American home, you may have noticed a ring of numbers near the chuck. These numbers can look confusing at first. Should you choose 5, 10, or 20? Does a higher number mean more speed? The answer depends on the drill and the setting you select.
On most cordless drill drivers, the numbered ring controls the clutch. The clutch limits how much twisting force, called torque, the drill applies before it slips. Many drills also have a separate speed selector marked 1 and 2, while a hammer drill may have additional symbols for masonry work. Once you understand these controls, you can choose settings with more care and get cleaner results on wood, metal, plastic, and other common materials.
Source: Bing
What Do the Numbers on a Drill Mean?
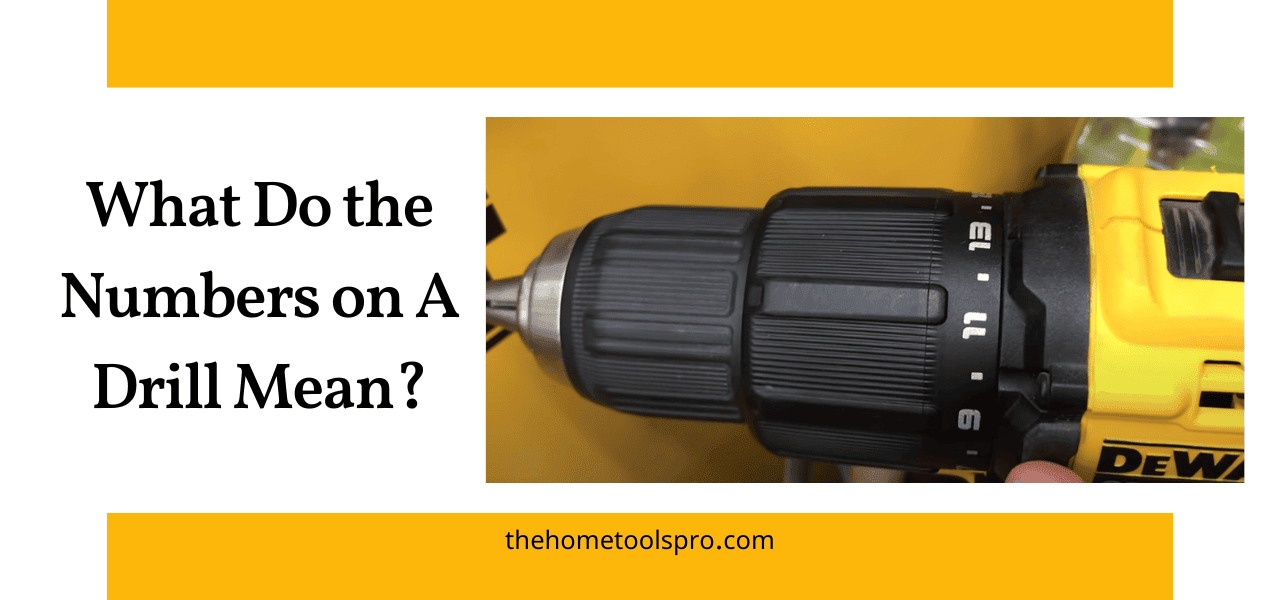
On most cordless drill drivers, the numbers around the collar behind the chuck represent clutch settings. The clutch helps control torque, which is the twisting force that turns a screw or drives a fastener into a material. When resistance reaches the selected limit, the clutch can slip and stop transferring full driving force to the screw.
For example, a drill with settings from 1 to 20 may allow you to select a lower torque limit at 3 and a higher limit at 15. The exact force represented by each number depends on the drill model. A setting of 10 on one brand does not necessarily match setting 10 on another.
These numbers do not normally represent revolutions per minute, inches, screw sizes, or a fixed torque measurement. They are relative settings intended to help you control the tool. Many drills also have a separate drill icon and a speed switch, so it helps to identify each control before starting.
Source: Bing
Low numbers
These usually set a lower clutch torque limit. They can help prevent small screws from stripping, breaking, or sinking too deeply.
High numbers
These usually allow greater torque before the clutch slips. They may be useful for larger fasteners or denser materials when the drill and fastener are suitable.
Drill symbol
This usually selects drilling mode, where the clutch is bypassed or behaves differently so the tool can apply more continuous torque.
Where Are the Numbers Located?
Look at the adjustable collar immediately behind the chuck, which is the part that holds the drill bit or screwdriver bit. On many cordless drill drivers, this collar has a series of numbers arranged around its outer surface. Rotate the collar until the number you want lines up with the reference mark on the drill housing.
Some models use a smaller number range, while others have more settings. Certain tools combine clutch, drilling, and hammer functions on one selector. If the markings differ from the usual layout, check the owner’s manual rather than assuming every symbol works the same way.
Find the reference mark
Use the small arrow, line, or mark on the drill body to identify the selected number.
Check the manual
Confirm what the collar controls on your exact model, especially if the drill has several modes.
Do All Drills Have Numbered Clutch Settings?
No. Many cordless drill drivers have adjustable clutch collars, but some basic drills and specialized drilling tools do not. An impact driver, for example, often uses a different mechanism and may have electronic speed or power modes instead of a numbered clutch collar.
A hammer drill may include a clutch ring, a drill mode, and a hammer mode. A dedicated rotary hammer may use a different selector altogether. Always identify the tool type before applying general drill-setting advice.
Drill driver
Often has numbered clutch settings and a separate gear selector.
Impact driver
Usually drives fasteners with repeated rotational impacts and may use electronic modes instead of a conventional numbered clutch.
Rotary hammer
Uses a hammering mechanism designed for masonry and concrete, with controls that depend on the model.
How Drill Clutch Settings Work
The clutch helps prevent the drill from applying too much twisting force when driving a screw. As the screw enters the material, resistance rises. When that resistance reaches the selected clutch limit, the mechanism slips or clicks instead of continuing to turn the screw with the same driving force.
This feature is especially useful for assembly work. A screw driven too far can damage a cabinet panel, crush soft wood fibers, or pull a screw head below the surface. Too little torque, on the other hand, may leave the screw sticking out or prevent it from reaching the required depth.
Think of the clutch as a limit rather than a guarantee. A low setting reduces the force the clutch allows, but it cannot make every screw safe to drive. Screw size, thread design, material hardness, battery condition, drill design, and the way you hold the tool all affect the result.
Source: Bing
Protect the screw head
A suitable clutch setting can reduce the chance of stripping the drive recess in Phillips, Torx, or other screw heads.
Protect the material
A lower setting can help prevent screws from sinking too deeply into softwood, plywood, plastic, or thin panels.
Improve consistency
Using the same tested setting for similar screws can help produce more even results across a project.
Why Does the Drill Click or Stop Turning?
A repeated clicking or slipping sound while driving a screw often means the clutch has reached its selected torque limit. This can be normal. If the screw is not fully seated, increase the clutch setting one step at a time or check whether the screw is meeting excessive resistance.
Do not keep pulling the trigger after the clutch repeatedly slips. Repeated slipping wastes energy and can wear the clutch. If the drill struggles even at an appropriate setting, inspect the bit, screw, battery, and material before applying more force.
The screw is nearly flush
The clutch may be doing its job. Stop when the screw reaches the desired depth.
The screw stops too early
Increase the clutch setting gradually, use a suitable pilot hole, or check for a dull or incorrect bit.
The drill struggles or overheats
Release the trigger, let the tool cool, and check the application, bit, battery, and material.
What Is the Best Drill Number for Different Jobs?
The best clutch number is the lowest setting that drives the fastener to the required depth without repeated slipping. Start low, test the drill on a similar piece of scrap material, and increase the setting as needed. This method is more reliable than choosing a high number automatically.
A drill’s number range is not standardized across brands. The examples below are starting points for a typical drill driver with a clutch range of approximately 1 to 20. They are not manufacturer specifications, and the right number may differ substantially on your tool.
Source: Bing
Small screws in softwood
Begin near the low end, such as 2 to 5, and raise the setting only if the screw stops before reaching the correct depth.
Cabinet hardware and small household repairs
Try a low or middle setting, such as 4 to 8, then check the screw depth and material for damage.
Medium screws in common lumber
A middle setting, such as 8 to 12, may work as an initial test, depending on screw size and wood density.
Large screws in dense wood
A higher clutch setting may be needed, but pilot holes and a suitable fastener can be more important than increasing torque.
Drilling holes
Select the drill symbol or the manufacturer’s specified drilling mode rather than relying on a high clutch number.
Recommended Starting Settings by Task
Use this table as a practical guide, not a universal rule. The ranges refer to a hypothetical drill with settings from 1 to 20. Test each setting on scrap material before working on a finished surface.
Flat-pack furniture
Start low. Particleboard and thin furniture panels can strip easily, and hand tightening may be better for the final turn.
Drywall screws
Use a suitable drywall screw setting or depth-control attachment when available. Avoid driving the screw so deeply that it tears the paper face.
Deck screws
Use the fastener manufacturer’s guidance and test the setting on scrap decking. Pilot holes may help near board ends or in dense wood.
Metal screws
Use the correct screw and drill bit, and begin with controlled speed and a suitable clutch setting if driving fasteners. Drilling metal holes requires a separate speed and bit choice.
Plastic components
Use low torque and gentle trigger pressure to reduce the chance of cracking or deforming the part.
Why the Same Number Can Give Different Results
A screw driven into pine may need less force than a similar screw driven into dense hardwood. A long screw can also require more torque than a short one, particularly if it has a wide shank or coarse threads. These differences explain why one fixed number cannot suit every job.
The drill itself matters, too. Clutch designs and torque ranges differ by model, and battery charge, gear selection, and bit condition can affect performance. Use the numbers as a repeatable starting point, then let the material and fastener guide your adjustment.
Material density
Harder or denser material can increase resistance and may require a pilot hole or a different fastener.
Screw size
Longer and wider screws often need more driving force, although thread shape and material also matter.
Bit fit
A poorly fitting or worn driver bit can slip and damage the screw head, even when the clutch setting is appropriate.
What Do the 1 and 2 Settings on a Drill Mean?
The separate switch marked 1 and 2 on many cordless drills selects the gear range. Unlike the numbered clutch collar, this switch affects the relationship between rotational speed and available torque. On many models, gear 1 is the slower, higher-torque range, while gear 2 is the faster, lower-torque range.
Gear 1 is often useful for driving screws, starting larger holes, or working with applications that need more controlled force. Gear 2 is often useful for smaller drill bits and tasks where higher rotational speed is appropriate. Exact speed ranges depend on the drill model.
Do not confuse gear 2 with clutch setting 2. Gear 2 usually selects a faster transmission range, while clutch setting 2 usually sets a low torque limit. They control different things, even though both use numbers.
Source: Bing
Gear 1
Usually offers slower rotation and more available torque. It is a common starting choice for driving screws.
Gear 2
Usually offers faster rotation and less mechanical torque advantage. It can suit smaller bits and faster drilling when the material allows it.
Variable trigger
Controls speed within the selected gear on many drills. Pulling the trigger farther generally increases rotation speed.
When Should You Use Low or High Gear?
Choose low gear when you need careful control, more torque at the chuck, or a slower start. This is often helpful for driving long screws or working with larger accessories that are approved for your drill.
Choose high gear when the task calls for faster rotation and the bit size and material support it. For example, a smaller twist bit in suitable wood may work well at a higher speed. Large hole saws and other high-load accessories may require lower speeds, so always follow their instructions.
For screws
Start with low gear and moderate trigger pressure to maintain control.
For small holes
Use a suitable gear and speed for the bit and material, often a faster range for smaller bits in wood.
For large hole saws
Use the accessory manufacturer’s recommended speed and a drill with sufficient capacity. Avoid using a high gear simply because it is available.
What Does the Drill Symbol Mean?
The drill symbol, often shown as a small drill bit, usually indicates drilling mode. In this position, the clutch is commonly bypassed or adjusted to allow sustained drilling torque rather than slipping at one of the numbered screw settings. This makes it more suitable for drilling holes in materials approved for the tool.
If you leave the collar on a low screw setting, the clutch may slip as the drill bit meets resistance. That can make it seem as though the drill lacks power. Switching to drilling mode may solve the problem, provided the bit, speed, material, and drill capacity are appropriate.
Drilling mode does not mean you should use maximum speed or force for every hole. A large bit, a hole saw, or a bit designed for metal may require a lower speed. Use the accessory instructions and the drill manual to choose the correct setup.
Source: Bing
Use drilling mode for holes
Choose the drill symbol for ordinary drilling when the manual recommends it, rather than a low clutch number.
Use clutch mode for screws
Select a numbered setting when you want the clutch to limit driving torque.
Check the bit
Match the bit to the material and hole size, and confirm that its shank fits the chuck and its speed rating suits the tool.
What If the Drill Symbol Is Missing?
Some drills have no separate drilling icon. They may use a different selector, a dedicated drilling mode, or no adjustable clutch at all. If you cannot identify the correct position, consult the manual for your exact model before drilling.
Do not assume that the highest numbered clutch setting is identical to drilling mode. On some tools, a high clutch setting can still slip, while drilling mode is intended to bypass the usual torque limit.
Inspect the markings
Look for a drill bit icon, mode selector, or instructions printed on the tool.
Verify the function
Use the manufacturer’s manual when symbols or control layouts differ from common designs.
What Do the Hammer Settings on a Drill Mean?
Some combination hammer drills have a hammer symbol or a selector for hammer drilling. This mode adds rapid impacts along the drilling direction while the bit rotates. It can help a compatible hammer drill make holes in masonry materials such as brick and certain types of concrete.
Hammer mode is different from the numbered clutch settings. The clutch controls the torque used to drive a fastener on many drills, while hammer mode adds a percussion action to the drilling process. Some models combine several functions on one collar, so read the markings carefully.
Do not use hammer mode on ordinary wood or metal drilling unless the tool and application instructions specifically call for it. The impacts can damage the bit, workpiece, or finish. For concrete, confirm whether your drill is rated for the task and use a compatible masonry bit.
Source: Bing
Screw symbol or numbered collar
Usually relates to clutch-controlled screw driving.
Drill bit symbol
Usually selects ordinary drilling mode.
Hammer symbol
Usually enables impact action for suitable masonry drilling on a compatible tool.
Can You Use Hammer Mode for Every Masonry Job?
No. The type of drill, masonry, hole diameter, and required depth all affect the correct method. A standard hammer drill may be suitable for some small holes in brick or masonry, while demanding concrete work may call for a rotary hammer designed for that purpose.
Before drilling into a wall, check for hidden wiring, plumbing, gas lines, and other services. Use appropriate eye and hearing protection, control dust, and follow local safety guidance. If you cannot establish what is behind the surface, stop and seek qualified help.
Use the correct masonry bit
Choose a bit designed for the material and compatible with the drill’s chuck and operating mode.
Control dust
Use suitable dust collection and respiratory protection as required for the material and task.
Check the wall first
Avoid drilling where hidden utilities may be present until the area has been checked safely.
How to Set Your Drill Correctly for Driving Screws
The easiest way to choose the correct clutch setting is to start low and test the result. This approach helps protect the workpiece and screw head while giving you a clear way to adjust the tool. You do not need to know the exact torque value for each number to use the clutch effectively.
Before you begin, gather the correct driver bit, screws, drill, and a scrap piece of the same or similar material. Make sure the battery is secure and the bit is properly seated. For important structural fasteners, use the specified fastener, installation method, and manufacturer instructions rather than relying on the clutch alone.
Source: Bing
Step 1: Select the correct bit
Use a driver bit that matches the screw head. A loose or worn bit is more likely to slip and damage the fastener.
Step 2: Select low gear
Choose gear 1 on a typical two-speed drill for controlled screw driving, unless the tool instructions specify otherwise.
Step 3: Choose a low clutch setting
Start near the lower end of the numbered range, especially with small screws or soft materials.
Step 4: Hold the drill straight
Keep the bit aligned with the screw and apply steady pressure without forcing the tool.
Step 5: Test on scrap material
Drive a screw into a similar surface and inspect its depth, the material, and the screw head.
Step 6: Adjust gradually
If the clutch slips before the screw reaches the correct depth, increase the setting one step at a time and test again.
How Do You Know When the Setting Is Right?
A suitable setting lets the screw reach the intended depth without repeated clutch slipping or visible damage. The screw head should sit where the project requires it, and the material should remain intact. For delicate materials, flush or slightly recessed may not be the correct goal; follow the fastener and material requirements.
If the screw stops early even at a higher setting, do not keep raising the number without checking the cause. A pilot hole, a sharper driver bit, a different screw, or a more suitable drill may be needed. For a screw that must hold a safety-critical load, follow the specified installation requirements.
Good result
The screw reaches the required depth, the drive recess remains intact, and the material shows no unwanted damage.
Too little torque
The clutch slips while the screw remains proud of the surface. Check the bit and pilot hole before increasing the setting.
Too much driving force
The screw sinks too far, the head strips, or the material cracks. Stop and reduce the clutch setting.
When Should You Use a Pilot Hole?
A pilot hole is a smaller hole drilled before a screw is installed. It can reduce the force needed to drive a screw, help guide its path, and lower the risk of splitting wood near an edge. The correct pilot-hole diameter depends on the screw, the wood, and whether the screw’s threads need to grip the material.
Pilot holes are especially useful for dense hardwood, long screws, and work near board ends. They are not a substitute for the correct fastener or installation method, and some screws or materials have specific preparation requirements. Follow the screw manufacturer’s instructions where available.
Near the edge of wood
A pilot hole can help reduce splitting when the screw is installed close to an edge.
For long screws
A suitable pilot hole may reduce driving resistance and help the screw follow the intended path.
Common Mistakes When Reading Drill Numbers
Most problems arise when people assume every number controls the same function or use the highest setting for every job. Understanding the difference between clutch torque, gear speed, and operating mode prevents many avoidable errors. A few simple checks can also help you spot problems before they damage a fastener or workpiece.
Source: Bing
Mistake: Assuming a higher number means faster rotation
The clutch number usually controls the torque limit. Use the separate gear switch and variable trigger to control rotational speed.
Mistake: Using the highest clutch setting for every screw
Excessive driving force can strip screw heads, split wood, or damage thin panels. Begin low and adjust based on a test.
Mistake: Drilling with a low clutch setting
The clutch may slip when the bit meets resistance. Select the drilling mode recommended by the tool manufacturer.
Mistake: Treating settings as standardized
A number on one drill may not deliver the same torque as the same number on another model. Use model-specific instructions and test the result.
Mistake: Ignoring the driver bit
A mismatched, damaged, or worn bit can slip regardless of the clutch setting. Replace worn bits and use the correct drive type.
Mistake: Forcing a stuck drill
If the bit binds or the motor stalls, release the trigger and assess the cause. Forcing the tool can cause sudden twisting, damage, or loss of control.
What If the Drill Keeps Slipping?
First, determine whether the clutch is slipping or the driver bit is slipping in the screw head. Clutch slipping often produces repeated clicks from the tool, while bit slipping can leave visible damage in the screw’s drive recess. The two problems need different fixes.
If the clutch slips, increase the setting gradually or select the appropriate drilling mode if you are drilling a hole. If the bit slips, stop and fit a correct, undamaged bit. If the drill continues to slip unexpectedly, check the manual and have the tool inspected if needed.
Repeated clutch clicks
Check the clutch setting, gear, screw size, and whether the application exceeds the drill’s capacity.
Damaged screw head
Use a correctly sized driver bit and maintain alignment. Replace the screw if its drive recess is badly damaged.
Chuck or bit movement
Stop the tool and check that the bit is seated and the chuck is tightened according to the manual.
Drill Numbers, Torque, and Safety
The clutch helps control screw-driving force, but it is not a safety guarantee. A drill can still twist suddenly when a bit binds, throw debris, damage a workpiece, or contact hidden wiring. Use the correct tool and accessories for the job, and keep control of the drill with a stable stance and a firm grip.
Wear suitable eye protection when drilling or driving screws. Secure the workpiece instead of holding a small part in your hand, keep loose clothing and hair away from rotating parts, and remove the battery before changing accessories or making adjustments that could cause accidental activation. Follow the instructions supplied with the drill.
Before drilling into walls, floors, or ceilings, check for hidden electrical cables, pipes, and other services. In the United States, household wiring and plumbing may run through concealed spaces where they are not visible. If the location is uncertain or the job involves a high-risk installation, stop and seek qualified assistance.
Do not use a clutch number as a substitute for a specified torque value on a critical assembly. Some mechanical connections require a calibrated torque wrench or a manufacturer-approved installation procedure. A numbered drill collar usually does not provide a verified torque measurement.
Source: Bing
Wear eye protection
Use safety glasses suitable for the work and the debris the operation may produce.
Secure the material
Use clamps or an appropriate fixture to prevent the workpiece from spinning or moving.
Avoid hidden utilities
Check the intended drilling location and stop if you cannot rule out concealed wiring or plumbing.
Use the right torque method
Follow specified torque values with an appropriate calibrated tool when a connection requires a measured torque.
Can Drill Clutch Numbers Replace a Torque Wrench?
No. The clutch numbers on a typical cordless drill are relative settings, not calibrated torque values. They are useful for general screw driving, but they do not establish that a bolt or other critical fastener has reached an exact torque specification.
For automotive work, machinery, structural connections, and other applications with a specified torque, use the required tool and procedure. A calibrated torque wrench or a specialized installation tool may be necessary, depending on the application.
General DIY screw driving
A clutch setting can help control the depth and driving force for ordinary household projects.
Critical fasteners
Use the specified torque value and approved method rather than estimating torque from a drill collar.
Frequently Asked Questions
Q
Do higher numbers on a drill mean more power?
Higher numbers on the clutch collar usually allow more torque before the clutch slips. They do not normally increase the drill’s maximum motor power or rotational speed. The separate gear selector and trigger usually control speed.
Q
What number should I set my drill to for screws?
Start with a low clutch number and test the drill on scrap material. Increase the setting gradually until the screw reaches the required depth without repeated slipping or damage. The correct setting depends on the screw, material, and drill model.
Q
Should I use a high number or the drill symbol for drilling holes?
For ordinary drilling, use the drill symbol or the mode specified in the manufacturer’s instructions. A high clutch number may still allow the clutch to slip, while drilling mode is usually designed for sustained drilling torque. Select the correct speed for the bit and material.
Q
What is the difference between drill settings 1 and 2?
On many two-speed drills, gear 1 provides slower rotation and more available torque, while gear 2 provides faster rotation. These gear numbers are different from the numbered clutch settings, which usually control the torque limit during screw driving.
Q
Why does my drill click when I drive a screw?
The clicking often means the clutch has reached its selected torque limit. If the screw is not fully seated, check the driver bit, screw, material, and pilot hole, then increase the clutch setting one step at a time if appropriate. Stop if the tool binds, overheats, or behaves unexpectedly.
Q
Do drill clutch numbers mean the same thing on every brand?
No. Clutch designs and torque ranges vary by model and manufacturer. A setting of 10 on one drill may not match setting 10 on another, so use the manual and a test piece rather than relying on a universal number.
Q
Can I use the numbered clutch settings to drill into concrete?
The numbered collar usually controls screw-driving torque, not the hammer action needed for masonry. If your tool is a compatible hammer drill, select the appropriate hammer or drilling mode and use a suitable masonry bit. Confirm the tool’s capacity and check for hidden utilities before drilling.
✦ Wrapping Up
Conclusion
The numbers on most cordless drill drivers control the clutch torque limit. Low settings help prevent damage when driving small screws or working with soft materials, while higher settings allow more driving force before the clutch slips. They do not normally indicate speed or a fixed torque value.
Remember to distinguish the numbered clutch collar from the 1 and 2 gear selector, the drill symbol, and any hammer mode. Each control has a different purpose, and the exact layout depends on the drill. Start with the manufacturer’s instructions, choose a suitable bit and mode, and test your setting on scrap material before working on the finished project.
💡 Key Takeaway
For your next DIY project, select low gear, start with a low clutch number, and drive one test screw into a similar piece of material. Adjust the clutch gradually until the screw reaches the correct depth without stripping or damaging the surface.
I’m a little tired of pink tools being judged by their color before anyone checks the voltage or included bits. A good drill set for women should fit the job,…
Two cheap, mismatched tools can slow down even the simplest weekend job. Finding the right impact wrench and drill set starts with checking the chuck sizes,…