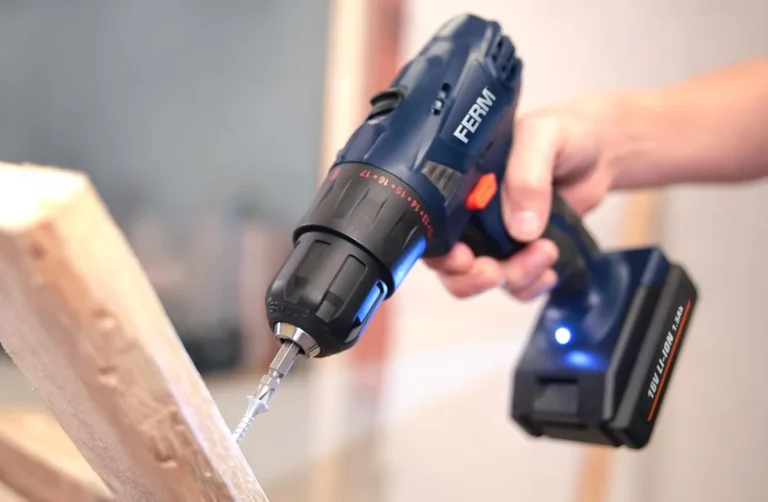
Drill bits are cutting tools used to make holes, enlarge openings, remove material, and prepare surfaces for screws, bolts, wires, and other fittings.
From hanging shelves in an American home to fixing a fence, building a deck, or installing a cabinet, drill bits help turn a power drill into a tool for many jobs. Each bit has a shape and cutting edge made for a certain task. The right one can make a clean hole with less effort, while the wrong one can damage the workpiece or wear out quickly.
The best drill bit depends on the material, hole size, and job. A standard twist bit works for many wood and metal tasks, but concrete needs a masonry bit, and glass or ceramic tile calls for a bit made for those hard, brittle surfaces. Some bits also help drive screws, cut large openings, or create countersinks. Knowing these differences helps you choose the right tool before you start drilling.
Source: proleantech.com
What Are Drill Bits Used For?
Drill bits are attachments that fit into the chuck of a drill or another compatible tool. As the tool spins, the bit cuts, grinds, or removes material to form an opening. Some bits also shape the edge of a hole or help prepare a surface for a fastener.
The most common use is drilling holes. You may need a small hole for a screw, a larger hole for a pipe, or a deep hole for an anchor. The bit’s shape, cutting material, and size determine how it performs.
Drill bits also serve jobs beyond making simple round holes. Some cut wide openings in wood, some create flat-bottomed recesses, and others help drive screws. Choosing the right design makes the work more controlled and helps protect both the material and the tool.
Source: redboxtools.com
Making holes
Create openings in wood, metal, plastic, masonry, and other materials for fasteners, fittings, or cables.
Preparing screw holes
Make pilot holes that guide screws and can reduce splitting in wood when the size is suitable.
Cutting large openings
Use hole saws or other large-hole cutters for openings used by pipes, vents, and electrical fittings.
Shaping hole edges
Use countersink bits or counterbore tools to create space for screw heads or other fittings.
Driving fasteners
Fit a compatible screwdriver bit into a drill or impact driver to install or remove screws.
How a Drill Bit Works
A drill bit rotates while its cutting edges remove small amounts of material. Flutes, which are the grooves along many bits, help carry chips away from the cutting area. This helps the bit keep cutting instead of packing the hole with waste.
Different materials need different cutting methods. A wood bit may use a sharp center point and outer spurs to guide the cut. A metal bit often uses angled cutting lips, while a masonry bit may use a hard carbide tip to break away brittle material. The shape is not just cosmetic; it changes how the bit enters and cuts the surface.
Cutting edge
The edge removes material as the bit rotates.
Flutes
The grooves help carry chips or dust out of the hole.
Shank
The part held by the drill chuck or another compatible holder.
Common Types of Drill Bits and Their Uses
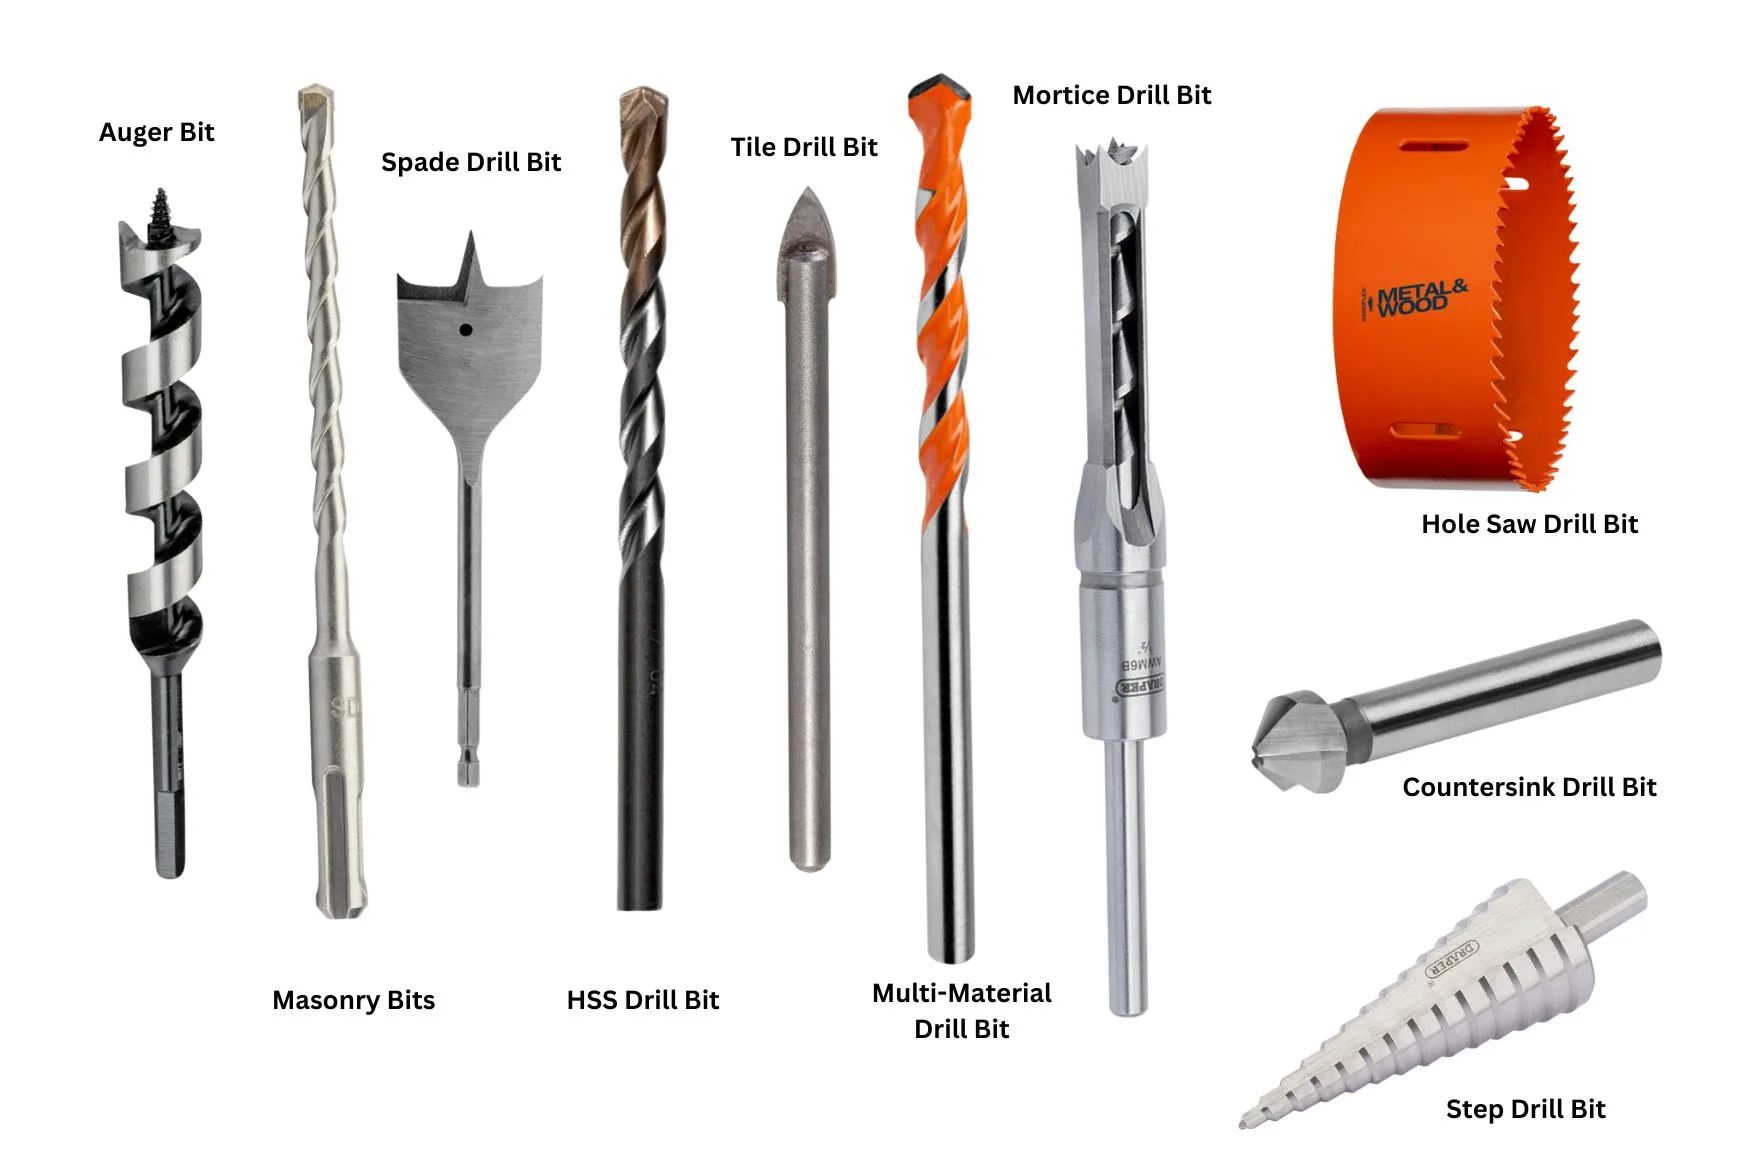
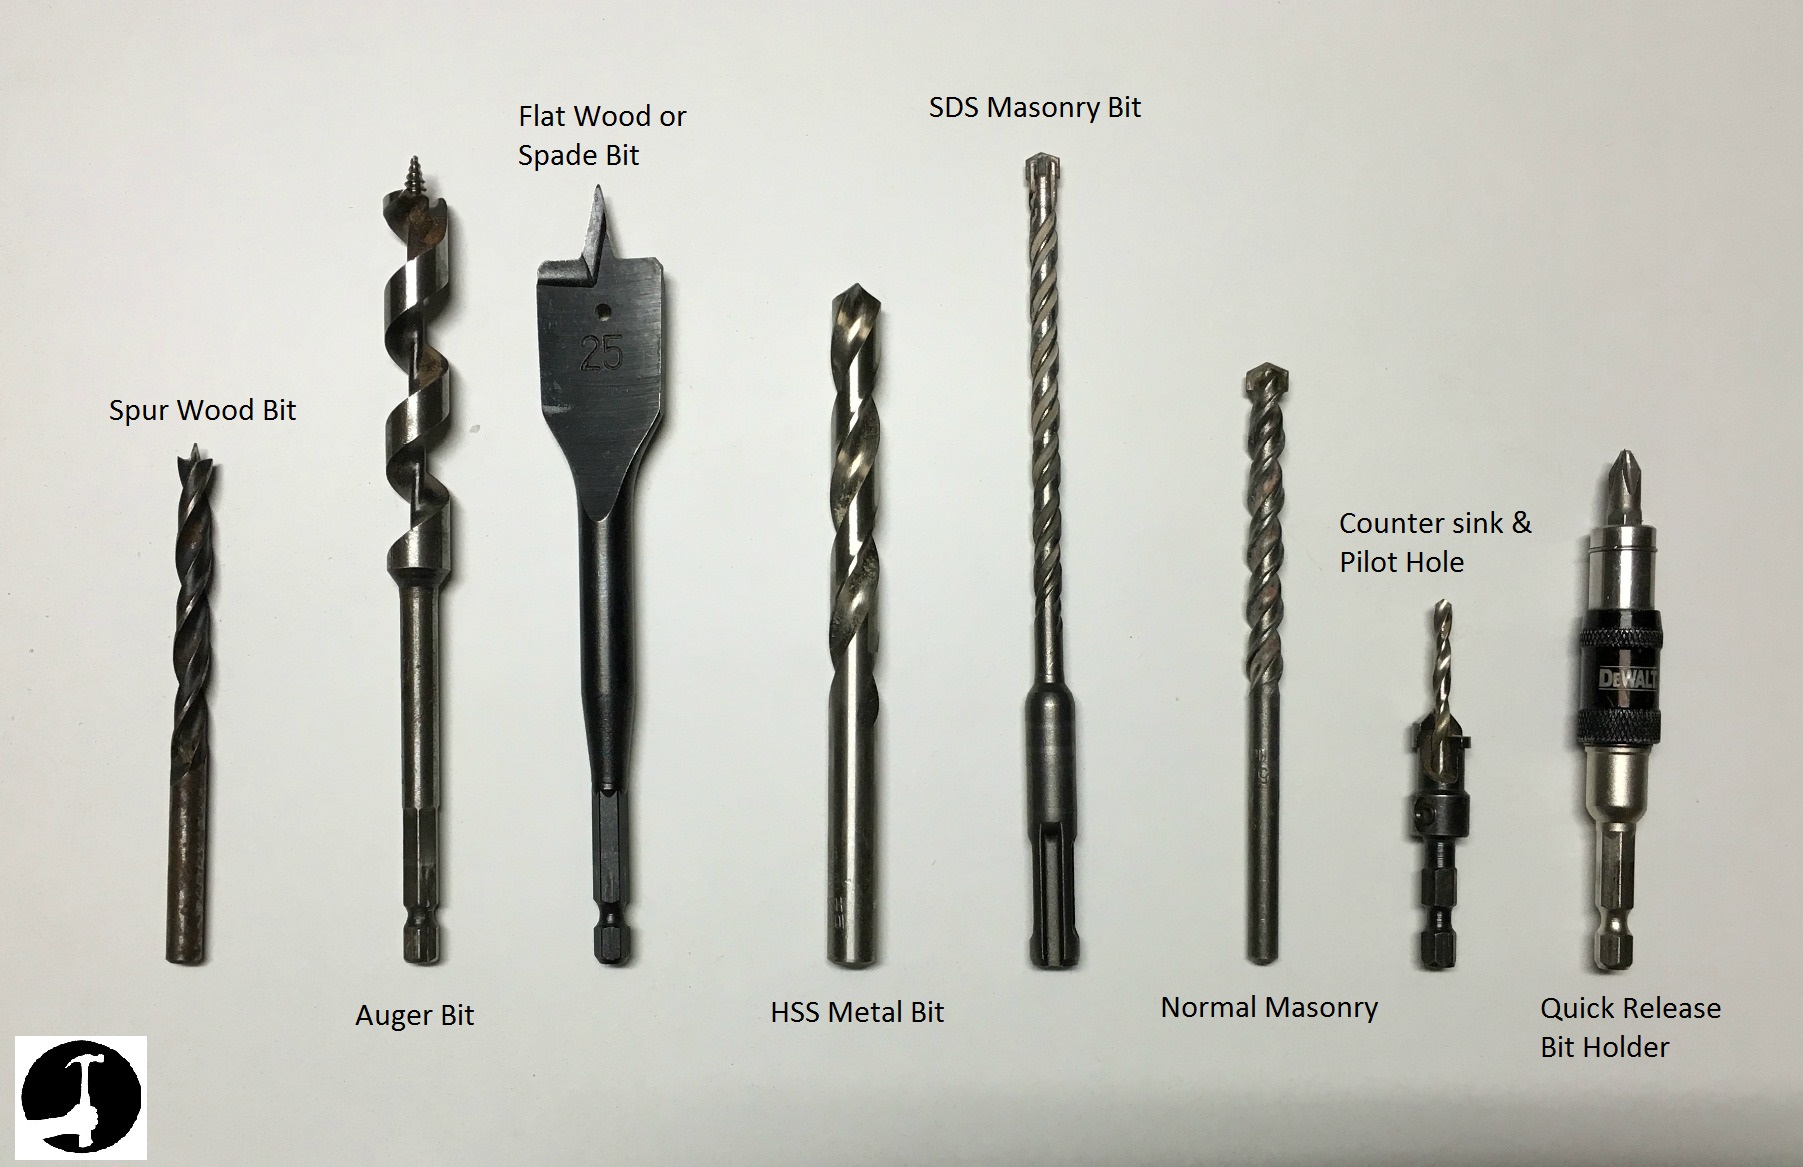
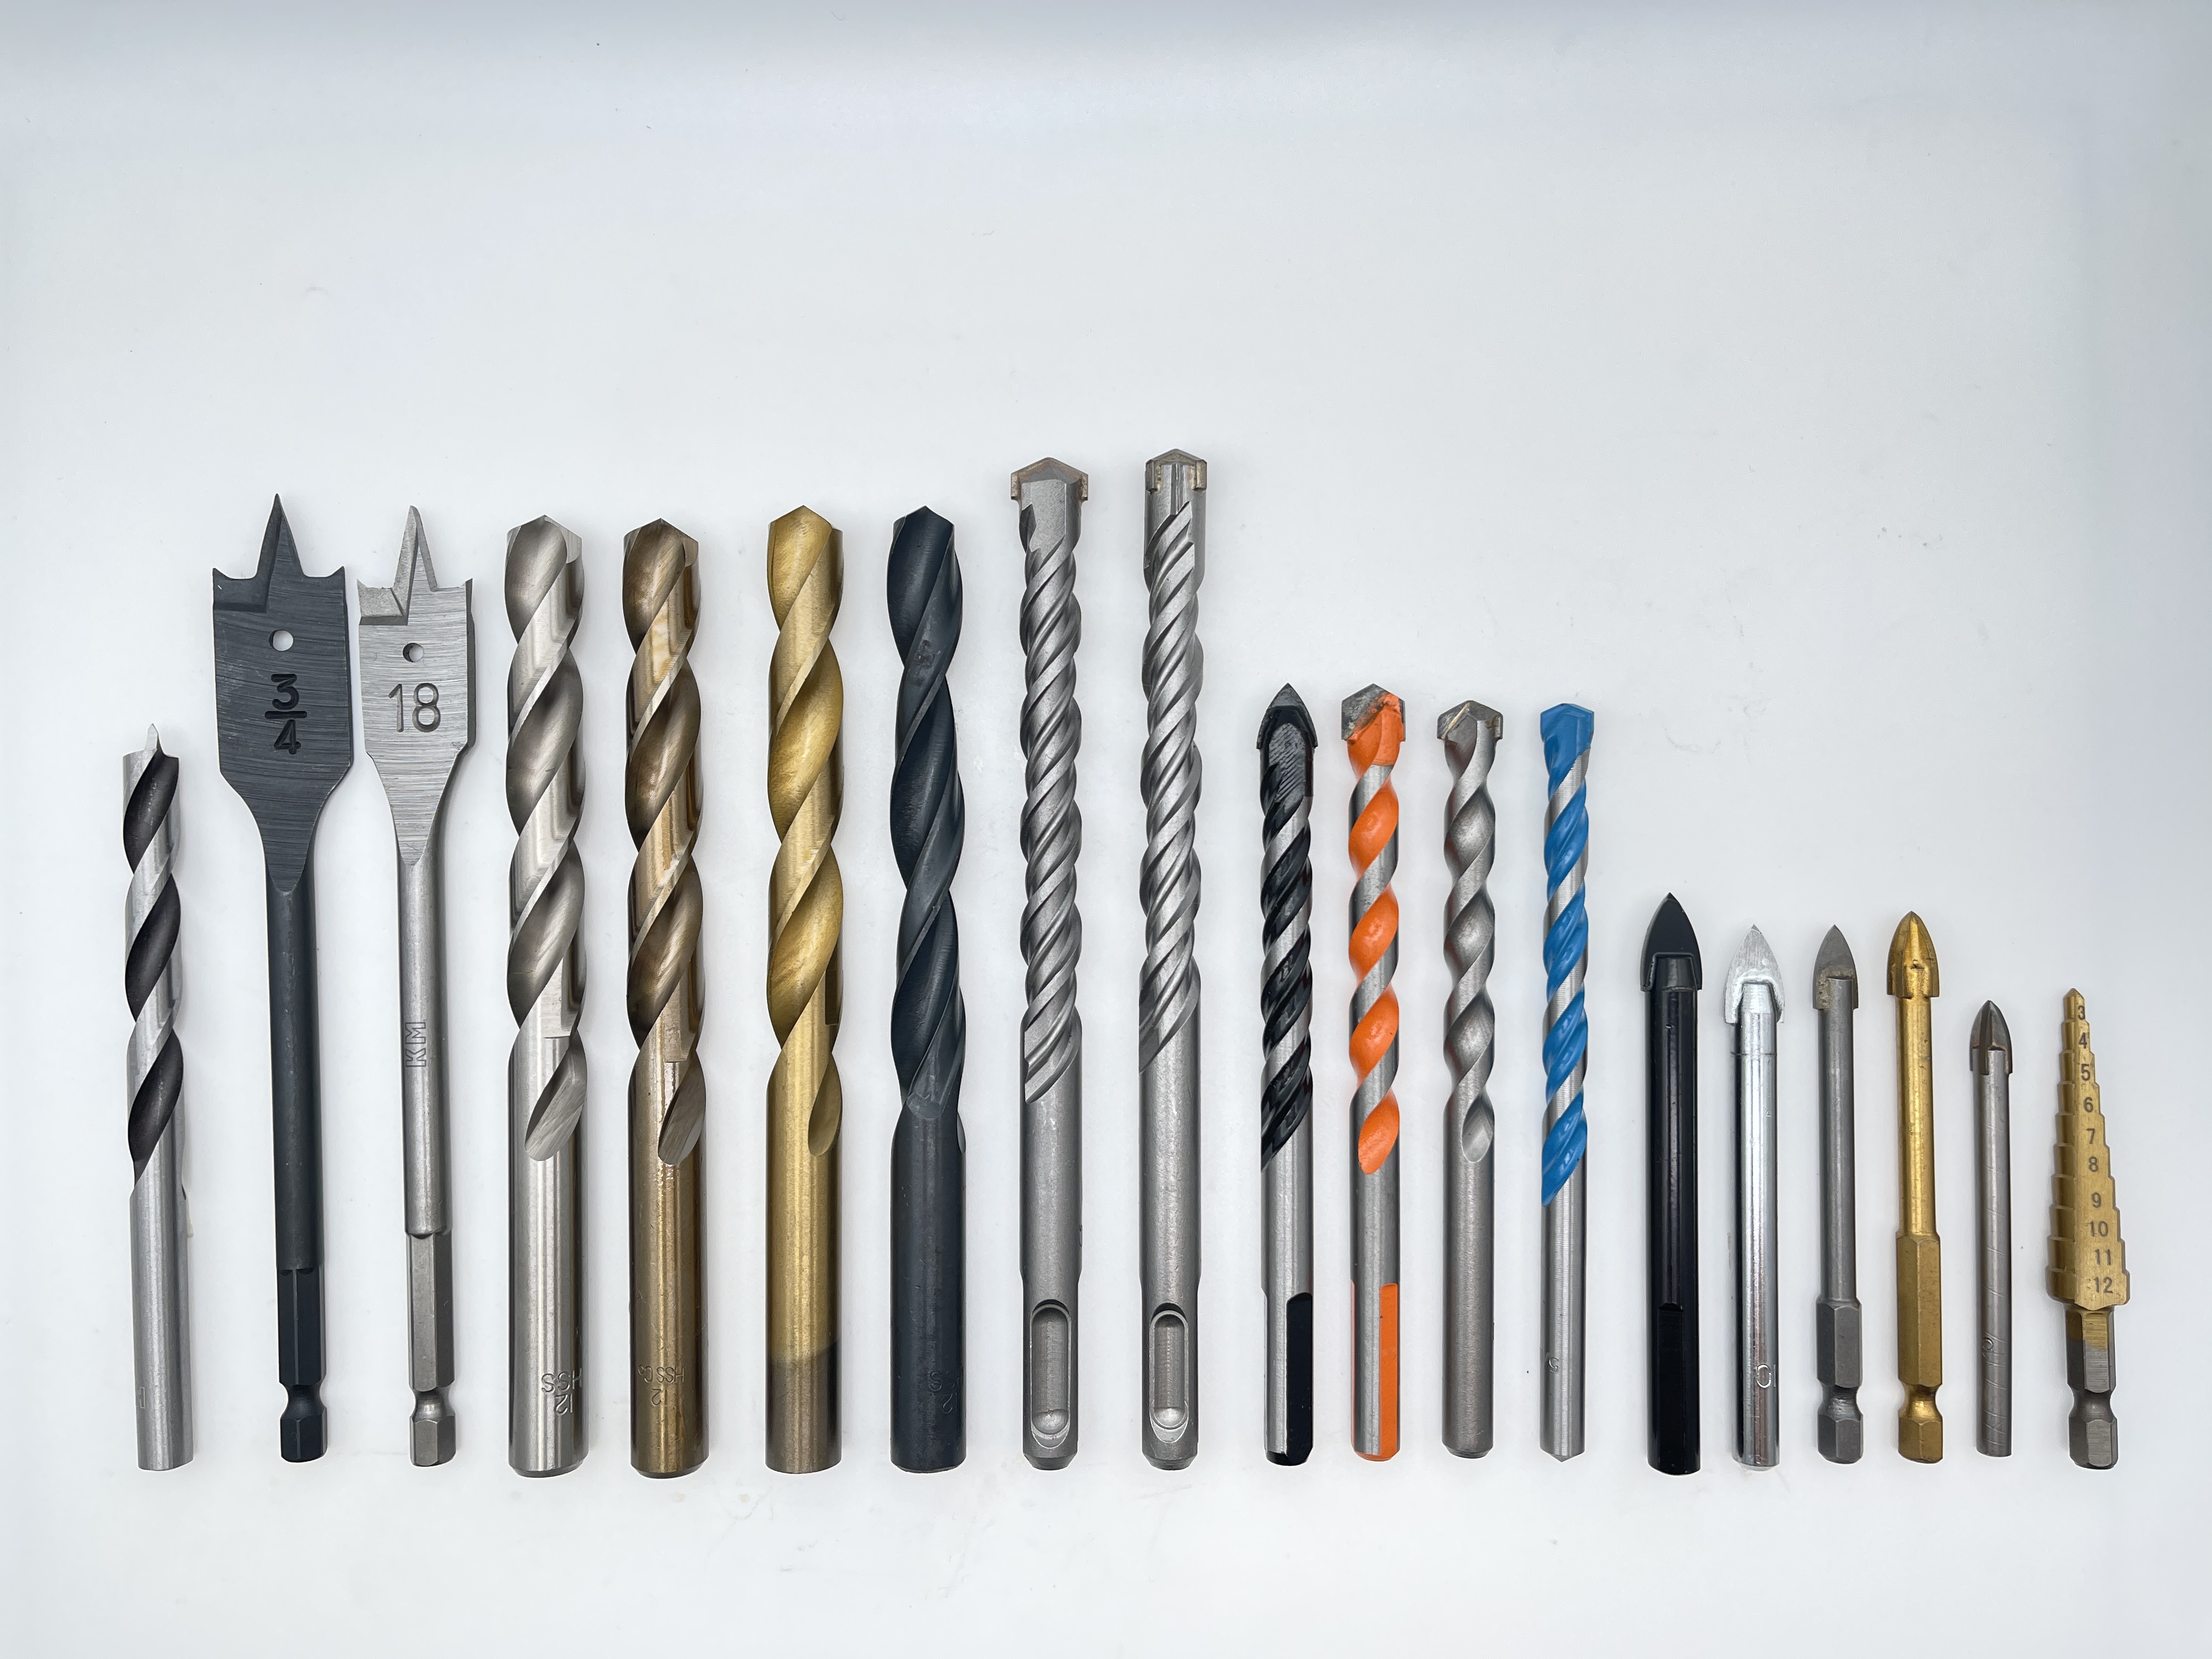
Each drill bit type has a main purpose, though some designs can handle more than one material. A twist bit is a common general-purpose choice, while spade bits and hole saws make larger openings in wood. Masonry bits work with brick, block, and concrete when used with a suitable drill.
Before choosing a bit, check its label and the manufacturer’s instructions. A bit that looks similar to another may have a different tip, cutting edge, or material rating. These details matter when the job involves hard surfaces or a precise hole.
Source: carpentry-tips-and-tricks.com
Twist drill bits
General-purpose bits with spiral flutes. High-speed steel versions are widely used for wood, plastic, and many metal-drilling tasks within their rated limits.
Brad-point bits
Wood bits with a sharp center point and outer spurs. They help start holes accurately and make neat openings in wood.
Spade bits
Flat, paddle-shaped bits that make larger holes in wood, often for running wires or fitting small pipes.
Auger bits
Bits with a screw-like lead point that pulls the bit into wood. They are useful for deeper holes, depending on the tool and bit design.
Forstner bits
Bits designed to cut clean, often flat-bottomed holes in wood. They are useful for cabinet hardware and concealed hinges.
Hole saws
Circular cutters that make wide openings while leaving a central plug. Use a model rated for the material being cut.
Masonry bits
Bits with hard tips designed for brick, block, stone, and concrete. Some are intended for hammer drills or rotary hammers, while others are for rotary-only use.
Glass and tile bits
Specialized bits for selected glass, ceramic, or tile surfaces. Their design helps limit chipping when used with the correct speed and method.
Countersink bits
Tools that widen the top of a drilled hole into a sloped recess so a compatible flat-head screw can sit flush with the surface.
Screwdriver bits
Attachments used to turn screws. They are not drill bits in the strict cutting sense, but they often come in drill bit kits and serve a related fastening task.
Twist Bits for Everyday Drilling
Twist bits are among the most common bits found in home tool kits. Their pointed ends and spiral grooves make them useful for many small and medium holes. A suitable high-speed steel bit can drill wood, plastic, and softer metals, while cobalt or carbide options are made for more demanding materials or specific cutting conditions.
Do not assume that every twist bit works well on every surface. Standard high-speed steel bits can struggle with hardened steel, and a general-purpose bit is not a substitute for a proper masonry or tile bit. Check the package for the materials the bit is designed to cut.
Best use
General holes in materials listed on the bit’s packaging.
Main limit
Performance varies with the bit material, coating, geometry, and workpiece hardness.
Wood Bits for Clean, Accurate Holes
Wood bits are made to cut fibers and remove wood chips. A brad-point bit helps keep the hole centered, while a spade bit makes a larger hole quickly. An auger bit can suit deeper holes, and a Forstner bit is useful when a clean, flat-bottomed recess is needed.
The choice also depends on the finish you want. A hole for a hidden cable may not need the same clean edge as a hole for visible furniture hardware. Backing the wood with scrap material can reduce tear-out as the bit exits.
Small, neat holes
Use a brad-point bit when accurate placement and a clean entry matter.
Wide holes
Use a spade bit or suitable hole saw for larger openings.
Flat-bottomed recesses
Use a Forstner bit when the design calls for a broad, flat base.
What Drill Bits Are Used for Different Materials?
The material you are drilling is one of the most important factors in bit selection. Wood, steel, concrete, and ceramic tile respond to cutting in different ways. A bit made for one surface may cut poorly or cause damage on another.
Use the following table as a starting point, not a replacement for the bit maker’s instructions. Material coatings, surface treatments, workpiece thickness, and the type of drill can change which bit is suitable.
Source: civiconcepts.com
Wood
Use brad-point, twist, spade, auger, or Forstner bits according to the hole size and finish needed.
Metal
Use a metal-rated high-speed steel, cobalt, or other suitable twist bit. Secure the workpiece and select the correct speed.
Concrete and brick
Use a compatible masonry bit. A hammer drill or rotary hammer may be needed for some concrete tasks.
Tile and glass
Use a bit specifically rated for the tile or glass type, and follow its speed and cooling instructions.
Plastic
Use a sharp bit suited to the plastic and drill slowly enough to limit heat and melting.
Drill Bits for Wood
Wood is softer than most metals and masonry, so many wood bits cut quickly. Still, the type of wood and the hole’s purpose matter. Softwood, hardwood, plywood, and laminated boards can behave differently, especially near the surface or at the edge of a board.
For a small screw hole, a twist or brad-point bit may work well. For a wide opening to pass a cable through a cabinet, a spade bit or hole saw may be more suitable. Use a backing board when possible to help prevent splintering as the bit exits.
Pilot holes
Choose a bit based on the screw, wood type, and whether the hole is for the screw’s core or its clearance.
Furniture work
A brad-point or Forstner bit can help make accurately placed holes.
Large openings
Use a spade bit or hole saw rated for wood and compatible with the drill.
Drill Bits for Metal
Metal drilling needs a bit with suitable cutting edges and heat resistance. High-speed steel bits can handle many common metal tasks, while cobalt-alloy bits can be useful for tougher alloys when used correctly. A coating alone does not guarantee that a bit is suitable for hardened steel.
Mark the hole location before drilling and clamp the metal so it cannot spin or shift. Use a suitable speed and steady pressure. For many metal jobs, a cutting lubricant recommended for the material and bit can help control heat and wear, but always follow the product instructions.
Thin sheet metal
Use a suitable sharp metal bit, support the sheet, and avoid excessive pressure that may snag the bit.
Thicker metal
Use a bit rated for the metal and thickness, and follow the maker’s speed and lubrication guidance.
Hardened metal
Check the material hardness and bit rating. Some hardened parts need specialized tools or professional machining.
Drill Bits for Concrete, Brick, and Masonry
Masonry bits usually have a hard tip designed to break away brittle material. They are used for tasks such as fitting approved anchors, mounting brackets, or making holes in brick and concrete. The drill’s mode matters: some bits are designed for rotary drilling, while others are rated for hammer action or a rotary hammer.
Before drilling into a wall, check for hidden wires, pipes, and other services. Use a suitable detector and consult building plans where available. Do not drill into an unknown area simply because the surface looks clear.
Brick and block
Use a masonry bit matched to the anchor and material. Follow the anchor maker’s hole-size and depth requirements.
Concrete
Choose a compatible masonry bit and drill. Reinforced concrete may require specialized equipment.
Fragile masonry
Use the method recommended for the material to reduce cracking or surface damage.
Drill Bits for Tile and Glass
Tile and glass can crack if the bit slips, overheats the surface, or applies too much force. A bit designed for the specific material helps control the cut. Ceramic tile, porcelain tile, and glass do not all have the same hardness, so confirm the bit’s rating before starting.
Use a slow, controlled approach and follow the bit manufacturer’s guidance on cooling. Many tile and glass bits should not be used with hammer action. Once a hole passes through tile, check whether the material behind it needs a different bit, such as one rated for masonry.
Ceramic tile
Use a tile-rated bit and keep the drill stable to limit slipping and chipping.
Porcelain tile
Use a bit specifically rated for porcelain, which is often harder than standard ceramic tile.
Glass
Use a glass-rated bit and follow the maker’s instructions for support, speed, and cooling.
Drill Bits for Plastic
Plastic can soften or melt when friction creates too much heat. A sharp bit, steady control, and an appropriate speed help produce a cleaner hole. Some plastics are also brittle and may crack if the workpiece is unsupported or the bit grabs as it exits.
Test the setup on scrap material when possible. Avoid forcing the bit, and follow the material supplier’s guidance for sensitive or specialized plastics.
Thin plastic sheets
Support the sheet on a backing board and use a bit suitable for the plastic.
Brittle plastic
Use controlled pressure and avoid sudden force near the end of the cut.
How to Choose the Right Drill Bit
Choose a drill bit by matching it to the material, hole size, hole depth, and drill. Start with the material because that determines which cutting edge and bit material are suitable. Then check the size, shank, and any limits listed on the package.
A small mismatch can cause a poor result. A bit that is too large may leave a loose fastener, while a bit that is too small may make installation difficult or split wood. The right choice should meet the job’s actual needs rather than simply fit the drill.
Source: maintenanceskill.com
Step 1: Identify the material
Determine whether you are drilling wood, metal, plastic, masonry, tile, glass, or a layered surface.
Step 2: Define the hole
Check the required diameter and depth, along with whether the hole must be clean, flat-bottomed, or suitable for an anchor.
Step 3: Check bit compatibility
Confirm that the bit’s shank fits the drill and that the drill supports the required speed or hammer action.
Step 4: Review the bit rating
Read the package or manual for supported materials, maximum speed, cooling needs, and use restrictions.
Step 5: Inspect the bit
Avoid bits with cracked tips, bent shanks, damaged cutting edges, or heavy wear.
Drill Bit Material and Coatings
The material used to make a bit affects its hardness, heat resistance, and suitable uses. High-speed steel is common for general drilling. Cobalt-alloy bits can offer better heat resistance for certain metal-cutting tasks, while carbide is very hard and is used in specialized cutting tips and bits.
Some bits have coatings intended to reduce friction or improve wear resistance. A coating does not make every bit suitable for every material, and coating color alone is not a reliable way to identify a bit’s purpose. Read the label and use the bit within its rated limits.
High-speed steel
A common option for general drilling in suitable wood, plastic, and metal.
Cobalt alloy
Useful for selected demanding metal-drilling tasks where the bit and cutting conditions are appropriate.
Carbide
Used in hard, wear-resistant cutting tips and specialized bits for materials such as masonry or tile.
Coated bits
May offer reduced friction or improved wear resistance, depending on the coating and intended use.
Understanding Drill Bit Sizes
Drill bits come in different diameter and length options. In the United States, common sets use fractional-inch, numbered, letter, or metric sizes. The correct diameter depends on the task, such as making a pilot hole, fitting a wall anchor, or creating a clearance hole for a bolt.
For screws, do not choose a pilot bit based on the screw’s outside diameter alone. The screw’s core diameter, thread design, wood hardness, and the manufacturer’s guidance all matter. When fitting an anchor, follow the anchor maker’s specified hole diameter and depth.
Diameter
The width of the hole the bit is designed to make under suitable conditions.
Length
Affects the depth the bit can reach, but longer bits may flex more and need careful control.
Pilot-hole size
Should suit the fastener and material, rather than follow one universal size rule.
Drill Bits vs. Screwdriver Bits: What Is the Difference?
Drill bits cut openings in a material, while screwdriver bits turn screws and similar fasteners. They may appear together in one tool kit, but they perform different jobs. Knowing the difference helps prevent damaged screws, worn bits, and poorly sized holes.
Many cordless drills can use both types of attachment when the shank and holder are compatible. Some impact drivers use hex-shank accessories designed for impact action. Check the tool and accessory ratings before use, especially when high torque is involved.
Source: i.ytimg.com
Drill bit
Cuts a hole in a material. Examples include twist bits, brad-point bits, and masonry bits.
Screwdriver bit
Engages a screw head so the tool can tighten or loosen it. Examples include Phillips, slotted, Torx, and square-drive bits.
Combination kits
May include both drilling and fastening accessories, but each attachment still has a specific purpose.
When to Drill a Pilot Hole Before Driving a Screw
A pilot hole is a smaller hole made before installing a screw. It guides the screw and can reduce the risk of splitting wood, especially near an edge or in a hard wood. It may also help the screw enter more accurately.
The correct pilot size depends on the screw and material. Some self-drilling screws are designed to cut their own path in specified materials, so a separate pilot hole may not be needed. Follow the fastener maker’s instructions when the connection must meet a defined load or installation requirement.
Use a pilot hole
When the material, screw design, or location makes splitting or misalignment a concern.
Check the fastener
Match the hole size and depth to the screw or anchor instructions.
Common Drill Bit Problems and How to Fix Them
If a drill bit stops cutting well, do not respond by pushing harder. The cause may be a dull edge, the wrong bit type, excessive speed, poor chip removal, or a loose workpiece. Stop the drill, disconnect the power or remove the battery, and inspect the setup before making another attempt.
A good troubleshooting order starts with safety and compatibility. Check the bit, material, and drill mode first, then adjust the technique according to the manufacturer’s instructions. If the material is unknown or the job involves a critical structure, hidden services, or a high-risk installation, get qualified help.
Source: eurocutex.com
The bit will not cut
Check whether the bit is made for the material, whether its cutting edge is worn, and whether the speed and drill mode are suitable.
The bit overheats
Stop and let the bit cool as directed. Review the speed, pressure, chip removal, and recommended lubrication.
The hole is rough or oversized
Check bit condition, workpiece movement, alignment, and whether the bit type suits the material.
The bit slips on entry
Mark the location accurately, use a suitable center mark or guide where appropriate, and stabilize the tool.
The bit bends or breaks
Stop using it. Check for side loading, misalignment, excessive pressure, incorrect speed, or a damaged bit.
Why Does a Drill Bit Get Hot?
Friction creates heat as a bit cuts. Too much heat can dull the cutting edge, damage a coating, soften certain materials, or change the condition of a workpiece. Metal drilling is especially sensitive to speed, pressure, and the use of suitable cutting fluid where recommended.
Let the bit and material cool when needed. Do not touch a hot bit with bare fingers, and do not apply water or another coolant unless the bit, tool, and workpiece instructions allow it. Some electric tools and cutting accessories have specific restrictions.
Use the right speed
Follow the bit manufacturer’s guidance for the material and diameter.
Avoid excess force
Use steady pressure instead of forcing a dull or unsuitable bit through the material.
Clear chips safely
Stop the drill before removing tangled chips or cleaning the cutting area.
Drill Bit Safety Tips for Home and Workshop Projects
Safe drilling starts before the trigger is pulled. Wear safety glasses, secure the workpiece, and inspect the drill and bit for damage. Tie back long hair and keep loose clothing, jewelry, and hands away from rotating parts.
The drill can catch when a bit breaks through a surface or binds in the hole. This may twist the tool or move the workpiece. Keep a firm grip, use the appropriate handle when supplied, and do not use a bit that is bent, cracked, or loose in the chuck.
Before drilling into a wall, floor, or ceiling, check for hidden electrical wires, plumbing, and other services. In the United States, household electrical systems and building layouts vary, and a surface inspection alone cannot confirm that an area is safe to drill. If the route is uncertain, stop and consult a qualified professional.
Source: biglivinglittlefootprint.com
Wear eye protection
Use suitable safety glasses to protect against flying chips, dust, and fragments.
Secure the workpiece
Use clamps or another suitable method instead of holding a small part by hand.
Check for hidden services
Use appropriate detection tools and available plans before drilling into walls, floors, or ceilings.
Use the correct drill mode
Do not use hammer action on bits or surfaces that are not rated for it.
Control dust
Use suitable dust collection and respiratory protection when the material and task require them. Avoid creating or breathing hazardous dust.
Follow tool instructions
Respect the drill’s speed, attachment, chuck, and operating limits.
When Should You Stop and Call a Professional?
Stop if you suspect a hidden wire or pipe, encounter an unknown material, or find that the bit cannot cut safely. Drilling into structural concrete, reinforced elements, or areas with uncertain services can create risks that a basic home tool setup may not address.
Professional help is also appropriate when a hole affects a load-bearing part, requires a code-compliant installation, or must meet a precise engineering specification. A drill bit can make an opening, but it cannot confirm that the opening is safe for every purpose.
Unknown wall contents
Do not continue until the material and possible hidden services are understood.
Structural work
Get qualified advice before drilling structural members or reinforced concrete where the consequences of damage may be serious.
Damaged tools
Remove cracked, bent, or badly worn bits from use and replace them with compatible parts.
How to Maintain Drill Bits and Make Them Last
Proper care helps drill bits cut more reliably and reduces avoidable wear. After use, remove chips and dust with a safe method, then store the bits in a dry case or organizer. Keep cutting edges protected so they do not rub against other metal tools.
Inspect bits before each job. A dull bit may require more pressure and create extra heat, while a bent bit can produce an inaccurate hole or vibrate during use. Replace a damaged bit rather than trying to force it through another project.
Some bits can be sharpened, but the correct method depends on their design and material. Specialized bits may need specific equipment or a professional service. Do not grind a coated, carbide, or complex cutting bit unless you know that the method is suitable.
Source: i.ytimg.com
Clean after use
Remove chips and residue without placing fingers near sharp edges.
Store bits properly
Keep bits dry, organized, and protected from impacts or contact that can damage their tips.
Inspect cutting edges
Look for chips, cracks, heavy wear, rust, or other damage before starting a job.
Use suitable sharpening methods
Follow the bit maker’s guidance and replace bits that cannot be restored safely.
Avoid overheating
Use the proper speed, pressure, and cutting conditions for the material.
Signs That a Drill Bit Needs Replacement
A bit may need replacement when it cuts slowly despite correct setup, leaves an unexpectedly rough hole, shows visible damage, or becomes difficult to control. Rust, a bent shank, or a chipped tip can also affect performance.
Do not judge a bit only by its appearance. A bit can look intact but still have dull cutting edges. If sharpening is allowed for that design, use the correct process; otherwise, replace it with a bit rated for the task.
Visible damage
Cracks, broken tips, and bent shanks are reasons to stop using the bit.
Poor cutting
Check the material and drill settings first, then inspect the edge for wear.
Repeated overheating
Review technique and compatibility; replace the bit if its edge or structure has been damaged.
Frequently Asked Questions
Q
What are drill bits mainly used for?
Drill bits are mainly used to make holes in materials such as wood, metal, plastic, brick, and concrete. Depending on the design, they can also create large openings, prepare holes for screws and anchors, or shape the edges of a hole. The correct bit depends on the material and the required result.
Q
Can I use one drill bit for wood and metal?
Some high-speed steel twist bits can drill both wood and many types of metal, provided the bit is rated for the material and the correct speed is used. However, a wood-specific bit may not be suitable for metal, and a general-purpose bit may not give the cleanest result in wood. Check the bit’s packaging before using it.
Q
What is the difference between a drill bit and a screwdriver bit?
A drill bit cuts a hole, while a screwdriver bit turns a screw. Drill bits have cutting edges suited to materials such as wood, metal, or masonry. Screwdriver bits have tips shaped to fit screw heads, such as Phillips, slotted, Torx, or square-drive designs.
Q
Can I use a regular drill bit on concrete?
A regular wood or metal twist bit is generally not the right choice for concrete. Use a masonry bit rated for the material and a compatible drill. Some jobs require a hammer drill or rotary hammer, while others may be suited to rotary drilling. Follow the bit and tool instructions, and check for hidden services before drilling.
Q
How do I know what size drill bit to use for a screw?
The right pilot-hole size depends on the screw’s core diameter, thread design, and the material. In wood, a suitable pilot hole can help guide the screw and reduce splitting. For wall anchors, use the exact hole diameter and depth specified by the anchor maker rather than guessing from the screw size.
Q
Why does my drill bit keep slipping?
A bit may slip if the surface is smooth, the drill is not aligned, the bit is dull, or the workpiece moves. Mark the hole location, stabilize the material, and use a suitable guide or center mark when appropriate. Stop the drill before adjusting the bit, and never hold a small workpiece by hand while drilling.
Q
Do drill bits wear out?
Yes. Drill bits can become dull, chipped, bent, or corroded with use and poor storage. A worn bit may cut slowly, generate excess heat, or make a rough hole. Some bits can be sharpened with the right method, but damaged or unsuitable bits should be replaced.
✦ Wrapping Up
Conclusion
Drill bits are used for much more than making simple holes. The right design can help you drill wood, metal, plastic, tile, concrete, and other materials, as well as prepare openings for screws, anchors, pipes, and fittings. Twist bits handle many general jobs, while brad-point, spade, masonry, tile, and countersink bits meet more specific needs.
The key is to match the bit to the material, hole size, drill, and task. Read the bit label, inspect the cutting edge, secure the workpiece, and use the speed and method recommended by the manufacturer. These simple checks can help you get cleaner holes and avoid damage or injury.
💡 Key Takeaway
Before drilling, identify the material, choose a bit rated for that surface, confirm the required diameter and depth, secure the workpiece, and wear suitable eye protection. If you cannot confirm that the drilling area is safe, stop and seek qualified help.
A dewalt drill set xr should save you from buying separate drill and impact tools, then discovering the battery platform doesn’t fit. I know why these kits are…
The question “how to use a cordless drill” sounds simple, but the answer branches the moment you pick your first bit. Drilling a hole in a 2×4, chipping into…
Picking a bosch impact and drill set shouldn’t feel like guesswork when a drill driver and impact driver cover different parts of the job. An impact driver is…