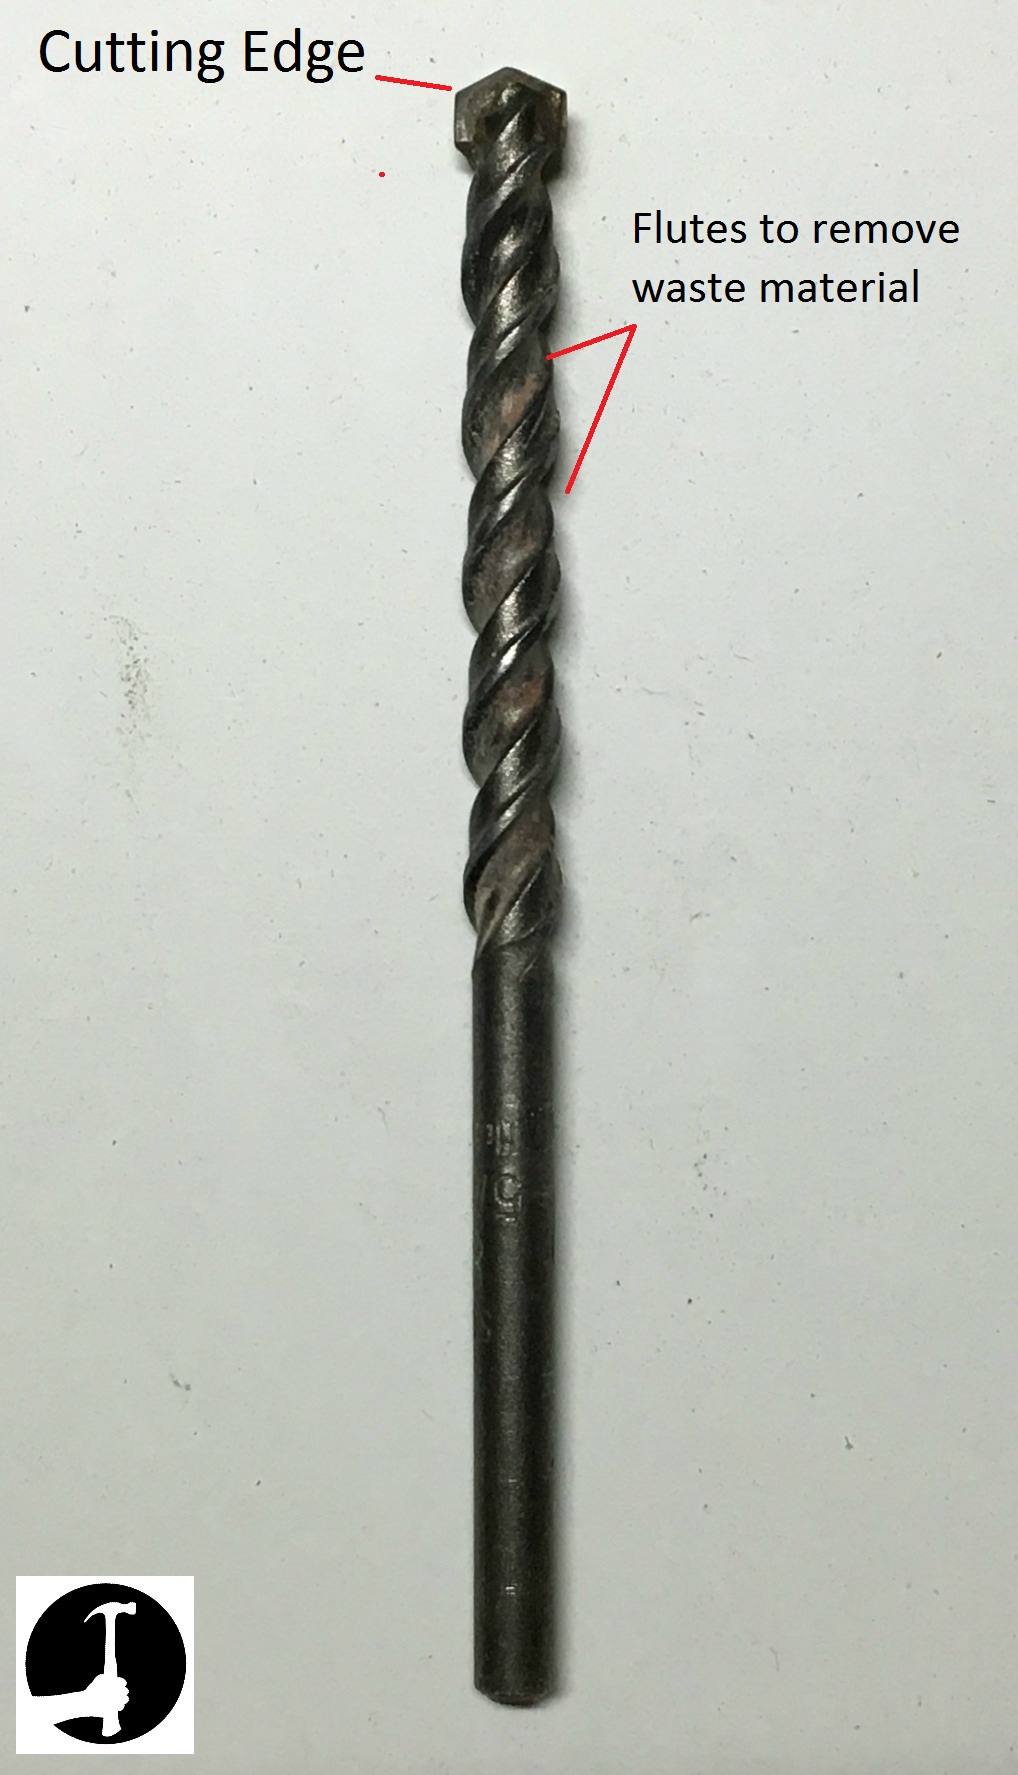
A masonry drill bit usually has a blunt, chisel-shaped carbide tip, a sturdy steel body, and spiral flutes that remove dust from brick, concrete, and stone.
If you are fixing a shelf in a Chicago apartment, mounting a TV in a Texas home, or repairing a brick wall in an older New England house, choosing the right drill bit matters. A wood or metal bit may look similar at first, but it is not made to handle hard masonry in the same way. You can often identify a masonry bit by looking closely at its tip and cutting edges.
The most useful clues are the tip shape, the material at the cutting end, and the spiral grooves along the shaft. These features help you tell a masonry drill bit from a wood bit, a metal bit, or a tile bit. This guide explains what to look for, how to check an unknown bit, and how to choose the right one for common home improvement jobs in the United States.
Source: Bing
What Does a Masonry Drill Bit Look Like?
A typical masonry drill bit has a steel shaft and a hard cutting tip that looks wider and less pointed than the tip of many wood or metal bits. The cutting end often resembles a small chisel or flattened arrowhead. On many common models, a carbide insert forms the cutting edge.
The shaft usually has spiral flutes, which are the grooves that run along the bit. These grooves help move dust out of the hole as the bit turns. Some masonry bits have a relatively thick tip and body to withstand the force involved in drilling into brick, concrete, or stone.
Not every masonry bit looks the same. Small bits for light-duty drilling may resemble ordinary twist bits, while bits for rotary hammers can have special shanks and larger cutting heads. Identification is easiest when you examine the tip, shaft, and markings together.
Source: Bing
Blunt or chisel-shaped tip
The tip is often wider and flatter than a sharp wood-boring point. A carbide cutting edge may appear as a small plate or broad cutting head.
Hard cutting material
Many common masonry bits use tungsten carbide at the tip because it can withstand the abrasive nature of mineral materials.
Spiral flutes
The grooves help carry dust out of the hole. Their shape and size vary with the bit design and intended drill.
Sturdy shaft
The shaft supports the cutting end and must withstand the forces expected during drilling. Heavy-duty hammer bits may have a specialized shank.
Why the Tip Is the Best First Clue
Start by looking directly at the cutting end under good light. A common masonry bit has a hard, broad edge rather than a fine point made to pierce wood or cut metal. On some models, the carbide insert is visibly wider than the steel shaft just behind it.
A worn or damaged bit can make this feature hard to see. Dirt, rust, or a broken cutting edge may also hide the original shape. If the tip is badly worn, do not assume that it is suitable for masonry just because it once had a broad head.
Look for a broad cutting edge
Many standard masonry bits have a flattened or chisel-like edge that breaks hard material into small particles.
Check for a carbide insert
A distinct hard insert can support identification, although its exact appearance varies by manufacturer.
What the Flutes Tell You
The spiral grooves on a masonry bit look similar to those on some metal and wood bits. They help carry material out of the hole, but they are not a reliable identification feature on their own. Compare the flutes with the tip and any markings before deciding what the bit is designed to drill.
Inspect the groove shape
Masonry bits often have flutes designed to clear abrasive mineral dust, while other bits may use different shapes for chips or wood shavings.
Look for heavy-duty construction
A robust head and shaft can be a useful clue, but it does not replace checking the product markings.
How to Tell a Masonry Drill Bit From Other Drill Bits
The quickest way to identify an unfamiliar drill bit is to compare its cutting tip with bits made for wood, metal, and tile. These tools may share a similar spiral shaft, but their cutting edges serve different purposes. Using the wrong bit can lead to slow drilling, damaged materials, or a broken cutting edge.
Do not rely on color alone. Some drill bits have black oxide, gold-colored coatings, polished steel, or other finishes. Those finishes do not reliably tell you which material the bit can drill.
Source: Bing
Masonry bit
Often has a broad, blunt, carbide-tipped cutting head. It is designed for materials such as brick, concrete, and some types of stone.
Wood bit
A standard brad-point wood bit has a sharp center point and outer spurs that help score wood fibers. Other wood-boring designs have different shapes.
Metal bit
A common twist drill bit has a pointed tip with two cutting lips. High-speed steel and cobalt are common materials for metal drilling bits.
Tile bit
A tile bit may have a spear-shaped carbide tip or a diamond-coated cutting edge. Its design depends on the tile type and the manufacturer’s instructions.
Multi-material bit
Some bits are made to drill several materials, including wood, metal, and masonry. The packaging or manufacturer specifications should confirm their approved uses.
Masonry Bit vs. Wood Bit
A standard brad-point wood bit has a sharp point in the center and small spurs near the outer edge. These features help it start accurately and cut clean holes in wood. A common masonry bit instead has a harder, broader cutting tip built to work against mineral surfaces.
Auger bits and spade bits look very different from ordinary twist bits, so compare the actual designs rather than assuming every wood bit has the same shape. If you need to drill through a wooden stud and then into a masonry wall, use a suitable bit for each material rather than forcing one bit through both.
Sharp center point
This is a common clue for a brad-point wood bit.
Outer cutting spurs
These help score wood fibers before the main cutting edges remove material.
Broad, hard tip
This is common on masonry bits designed to break or abrade hard mineral material.
Masonry Bit vs. Metal Bit
A common metal twist bit ends in a pointed shape with two cutting lips that meet near the center. The point is designed to cut into metal as the bit rotates. A standard masonry bit usually has a wider, flatter head, often with a carbide cutting edge.
There are exceptions. Specialized metal bits, concrete bits, and multi-purpose bits may look unusual, so use the manufacturer’s markings when the tip is unclear. A metal bit is not a safe substitute for a masonry bit simply because it is sharp or made from hard steel.
Pointed cutting lips
These are common on standard twist bits made for metal.
Broad carbide head
This is common on many masonry bits.
Masonry Bit vs. Tile Bit
Tile bits are designed around the surface they need to cut. Some use a spear-shaped carbide tip, while others use diamond grit or a diamond-coated cutting rim. These designs can look quite different from the broad chisel-like head on a common masonry bit.
Ceramic tile, porcelain, natural stone, and the concrete or mortar behind them do not all behave the same way. A bit suitable for the backing material may chip or crack the tile face. Choose a bit approved for the specific tile and follow its speed and cooling instructions.
Spear-shaped tip
Often found on carbide tile bits for certain ceramic tiles.
Diamond-coated edge
Used on many bits designed for hard tile, porcelain, glass, or stone, depending on the model.
A Step-by-Step Method to Identify an Unknown Drill Bit
You can often identify a loose drill bit in a few minutes without testing it on a wall. Start with its markings and tip, then check the shaft and intended drill type. This method reduces the chance of damaging the bit or the material you plan to drill.
Source: Bing
Step 1: Clean and inspect the bit
Disconnect the drill from its power source before handling an installed bit. Remove loose dust with a dry brush, then inspect the cutting end under bright light.
Step 2: Examine the tip
Look for a broad, chisel-like cutting edge or a carbide insert. A sharp center point with clear outer spurs often indicates a wood bit instead.
Step 3: Read the markings
Check the shaft, case, label, or original packaging for terms such as masonry, concrete, carbide, SDS-Plus, or SDS-Max. Confirm the exact model if possible.
Step 4: Check the shank
A straight cylindrical shank is common on many standard drill bits. Grooved SDS shanks are used with compatible rotary hammers. Shank shape helps identify the tool system but does not prove the cutting material.
Step 5: Match the bit to the job
Confirm that the bit is rated for the material, hole diameter, and drill you intend to use. Do not rely on appearance alone if the use is unclear.
How to Read Drill Bit Markings
Manufacturers may print a diameter, length, material, series, or compatible shank system on the bit or its package. A marking such as 1/4 inch generally refers to the nominal bit diameter, while a length marking describes one of the bit’s length dimensions. The exact label format varies by brand.
Words such as masonry or concrete provide stronger evidence of intended use than a generic color or coating. Carbide describes a hard material used in many cutting tips, but carbide alone does not guarantee that a bit is designed for every masonry material or drilling method.
If a bit has no readable markings and its tip is damaged or unusual, compare it with the manufacturer’s catalog or ask a tool supplier to identify it. Replacing an unknown, worn bit is often safer than guessing.
Diameter
Usually indicates the nominal hole size the bit is designed to make.
Material or use label
Terms such as carbide tipped, masonry, or concrete help establish the intended application.
Shank type
Indicates whether the bit is intended for a standard chuck or a compatible specialized tool holder.
What If the Bit Looks Like Both a Masonry and Metal Bit?
Some multi-purpose bits blur the visual line between common categories. They may have a pointed cutting head or a design that works on several materials. In this case, the product label and the manufacturer’s stated applications are more reliable than a visual guess.
Avoid a trial-and-error test on concrete, tile, or a finished wall. If the bit cannot be identified with reasonable confidence, use a clearly labeled bit that matches the task.
Search the original packaging
A model number can help you locate the intended materials and compatible tools.
Compare with official product information
Look for a matching tip, shank, diameter, and stated application.
Which Masonry Drill Bit Works for Brick, Concrete, and Stone?
The best masonry bit depends on the material and the drill you plan to use. Brick, concrete, mortar, and natural stone are all mineral-based, but their hardness and structure can differ. A bit that works well in soft brick may struggle in dense concrete or a particularly hard stone.
For small holes in brick or light masonry, a standard carbide-tipped masonry bit may be suitable. For harder concrete or repeated drilling, a compatible hammer drill bit may be more effective. A rotary hammer with an appropriate SDS bit is often used for demanding concrete work, but the bit and tool must be matched to each other.
Tile requires extra care because the visible surface can crack or chip. Use a bit specifically rated for the tile type, and follow the recommended drilling speed and cooling method. Do not use hammer action on a tile surface unless the tile and tool instructions explicitly permit it.
Source: Bing
Brick
A suitable masonry bit can work for common brick, but softer or older brick may crumble. Use a controlled approach and choose the correct hole location.
Concrete
Dense concrete often calls for a bit and drill designed for impact drilling. Check whether the task needs a hammer drill or rotary hammer.
Mortar
Mortar joints can be easier to drill than the brick or stone around them, but they may also crumble. The correct anchor location depends on the wall and the intended load.
Natural stone
Stone types vary widely in hardness and brittleness. Confirm that the bit is suitable for the specific stone and use the manufacturer’s recommended method.
Ceramic or porcelain tile
Use a tile-rated bit suitable for the material. Start carefully, and do not engage hammer action on the tile face unless the product instructions allow it.
Standard Drill, Hammer Drill, or Rotary Hammer?
A standard rotary drill turns the bit without adding a hammering action. It may work for certain small holes in softer masonry when paired with a suitable bit, but drilling can be slow in hard concrete. The bit’s instructions should state whether this method is appropriate.
A hammer drill adds rapid impacts as the bit rotates. This can help a compatible masonry bit penetrate concrete and brick more effectively. A rotary hammer uses a different mechanism and often accepts SDS-style bits for more demanding work.
Do not force an incompatible bit into a chuck or holder. SDS-Plus and SDS-Max shanks are different systems, and the tool must accept the specific shank. Follow the tool manual for bit installation, operating modes, and protective equipment.
Standard drill
May suit some light-duty masonry tasks when the bit manufacturer permits it.
Hammer drill
Combines rotation and impact for compatible masonry drilling.
Rotary hammer
Uses a dedicated impact mechanism and compatible shank system for many heavier concrete tasks.
How to Choose the Right Bit Diameter
Choose a diameter based on the hole, anchor, or fastener instructions rather than guessing. Masonry anchors often require a specific hole diameter and depth. A hole that is too wide may not hold the anchor as intended, while a hole that is too narrow can prevent proper installation.
For example, if an anchor manufacturer specifies a 1/4-inch hole, use a compatible bit with that nominal diameter. This is a hypothetical example; always follow the instructions for the actual anchor. The diameter printed on the bit is not a guarantee that every drilling setup will create a perfectly sized hole.
Check the anchor package
Use its specified hole diameter and depth.
Confirm the bit length
Make sure the bit can reach the required depth without using an unsafe or awkward setup.
Clear dust as directed
Hole-cleaning instructions can affect anchor installation and holding performance.
Signs That a Masonry Drill Bit Is Worn or Damaged
A masonry bit can lose its cutting ability over time, especially when used in dense concrete or under excessive pressure. A worn bit may drill slowly, produce unusual heat, or struggle to remove dust. These signs can also point to the wrong drill mode, a poor bit match, or a material that is harder than expected.
Stop the tool before inspecting the bit. Unplug a corded drill or remove the battery from a cordless drill, and allow the bit to cool before touching the cutting end. Never inspect a moving bit or handle a hot tip with bare fingers.
Source: Bing
Rounded or chipped cutting edge
A damaged carbide tip may cut poorly or wander. Replace the bit if the cutting head is cracked, badly chipped, or otherwise unsafe.
Slow drilling
The bit may be worn, the drill may be unsuitable, or the material may be unusually hard. Check the tool setting and bit instructions before continuing.
Excessive heat
Heat may result from excessive pressure, unsuitable speed, a dull bit, or inadequate cooling where cooling is required. Stop and investigate rather than pushing harder.
Bent shaft or unusual vibration
A bent bit or damaged tool holder can cause unstable drilling. Stop using the setup and replace or have the damaged part checked.
Poor dust removal
Blocked flutes or packed dust may slow drilling. Follow the manufacturer’s safe procedure for clearing the hole and bit.
Why a Masonry Bit May Not Drill Concrete
If a bit spins without making much progress, first confirm that it is actually a masonry bit and is suitable for the concrete. Next, check whether the drill has the correct operating mode and whether the shank is seated properly. Do not assume that applying more force will solve the problem.
Concrete may contain hard aggregate that slows the cutting process. A bit can also strike reinforcing steel or encounter another hidden obstruction. If progress suddenly stops, the bit binds, or the drill behaves abnormally, stop and reassess the situation rather than forcing it.
Verify the bit
Confirm the intended material, diameter, and compatible drill type.
Check the operating mode
Use only the mode permitted by the tool and bit instructions.
Look for hidden hazards
Check for electrical wiring, plumbing, reinforcing steel, and other obstructions before drilling.
Replace damaged parts
Do not continue with a bent shaft, cracked tip, or visibly damaged tool holder.
Safety Tips for Identifying and Using Masonry Drill Bits
Drilling masonry can release fine dust, create flying debris, and expose hidden services inside walls. In the United States, older homes may contain materials that need special care, and a wall’s appearance does not reveal every hazard behind it. Plan the hole before starting and use the right protective equipment.
Silica dust is a particular concern when drilling concrete, brick, and other materials that contain crystalline silica. Repeated or heavy exposure can cause serious lung disease. Use a suitable dust-control method and follow applicable workplace rules and product instructions; a basic disposable mask should not be assumed to provide enough protection for every task.
Source: Bing
Wear eye protection
Use safety glasses or goggles appropriate for flying chips and dust. Add hearing protection when the tool’s noise level and the job call for it.
Control dust
Use an appropriate dust collection or other approved control method for the tool and material. Follow applicable silica exposure requirements for workplace jobs.
Check behind the surface
Use suitable detection methods and review available building plans to reduce the risk of striking wires, pipes, or other concealed services.
Secure the work area
Keep people clear of falling debris and hold the drill firmly with a stable stance.
Follow the tool manual
Use compatible bits, approved operating modes, and the manufacturer’s required handling and maintenance procedures.
When You Should Stop and Get Help
Stop if you suspect the wall contains live electrical wiring, a water line, gas piping, or another concealed service. Do not continue simply because the bit has not reached the expected depth. If the location cannot be verified, consult a qualified professional before drilling.
Older homes may also contain lead-based paint or asbestos-containing materials in certain building components. Do not drill or disturb a suspect material until you have determined what it is and what precautions are required. For load-bearing masonry, major structural work, or uncertain anchor loads, seek advice from a qualified building professional.
Unknown wall contents
Stop when you cannot confidently rule out a dangerous hidden service.
Suspected hazardous material
Avoid disturbing the material until the hazard and suitable controls have been assessed.
Structural or heavy-load work
Get qualified guidance when a hole or anchor could affect structural integrity or support a significant load.
Common Mistakes When Identifying Masonry Drill Bits
Many drill bit mistakes begin with a quick visual guess. A bit may have spiral flutes, a dark finish, or a sturdy shaft and still be intended for another material. Check several features before using it, especially when drilling into a finished wall or an expensive tile surface.
Source: Bing
Mistake: Judging by color
Black, gold, silver, and other finishes do not prove that a bit is designed for masonry. Identify the tip and verify the product markings.
Mistake: Assuming all carbide bits are masonry bits
Carbide is used in several cutting tools. Confirm that the exact bit is rated for the material and drilling method.
Mistake: Using a wood bit on concrete
A wood bit’s cutting geometry is not designed for ordinary concrete drilling and may wear or become damaged.
Mistake: Using a masonry bit on every tile
Some masonry bits may damage a tile face. Select a tile-rated bit for the specific surface.
Mistake: Forcing a bit into the wrong holder
A standard round shank and an SDS shank are not interchangeable in every drill. Check tool compatibility before installation.
Mistake: Pushing harder when drilling slows
Slow progress can indicate a dull bit, hard aggregate, a poor tool match, or an obstruction. Stop and diagnose the cause instead of applying excessive force.
A Quick Identification Checklist
Before drilling, use this short checklist to confirm the bit’s likely purpose. If any key feature remains uncertain, verify the model or choose a clearly labeled replacement.
Inspect the tip
Does it have the broad, hard cutting edge common to masonry bits?
Check the markings
Does the manufacturer identify the bit as suitable for brick, concrete, or another intended masonry material?
Confirm the tool
Is the shank compatible with the drill, and is the selected mode permitted?
Confirm the hole
Does the bit diameter and length match the anchor or installation requirements?
Prepare safely
Have you checked for hidden services and arranged appropriate dust control and protective equipment?
Masonry Drill Bit Identification at a Glance
This comparison table summarizes the main visual clues for common drill bit types. Treat the shapes as general indicators rather than absolute rules because specialized and multi-purpose designs can differ.
Source: Bing
Masonry
Common clue: a broad, blunt, often carbide-tipped head. Typical use: brick, concrete, and suitable stone.
Brad-point wood
Common clue: a sharp center point with outer spurs. Typical use: clean holes in wood.
Metal twist
Common clue: a pointed tip with cutting lips. Typical use: metal, subject to the bit’s material and specifications.
Tile
Common clue: a spear-shaped carbide tip or diamond cutting edge. Typical use: compatible tile or other specified hard surfaces.
Multi-material
Common clue: a design that may not match the usual categories. Typical use: only the materials listed by its manufacturer.
Which Identification Clue Should You Trust Most?
Use the manufacturer’s label or model information first, then confirm that the tip and shank match the stated design. The cutting tip is usually the strongest visual clue, while shaft color and flute shape are supporting clues. If the bit’s purpose is still unclear, do not test it on a valuable surface.
Most reliable
Verified manufacturer specifications for the exact bit.
Useful visual clue
The shape and construction of the cutting head.
Weak clue
Color, shine, or a spiral shaft viewed without the tip.
Frequently Asked Questions
Q
How can I tell if a drill bit is for masonry?
Look for a broad, blunt, chisel-like tip, often with a carbide insert. Then check the shaft or packaging for a masonry or concrete label. Because some multi-purpose bits have different tip shapes, verify the manufacturer’s specifications if you are unsure.
Q
Can I use a regular drill bit on brick?
A standard wood or metal bit is generally not the right choice for drilling brick. Use a bit designed for masonry and compatible with your drill. For some light-duty jobs, a suitable masonry bit may work with a standard rotary drill, but harder materials may require hammer action.
Q
Are all masonry drill bits carbide tipped?
No. Many common masonry bits use carbide tips, but designs and cutting materials vary. Check the manufacturer’s description to confirm the intended material, drilling method, and compatible tool.
Q
Can I use a masonry drill bit on wood or metal?
A masonry bit is not the best choice for ordinary wood or metal drilling because its cutting geometry is designed for mineral materials. Use a bit made for the material whenever possible. If a multi-material bit is explicitly rated for wood or metal as well as masonry, follow its stated limits.
Q
What is the difference between a masonry bit and a concrete bit?
The terms can overlap in product descriptions. Many masonry bits are suitable for some concrete applications, but not every bit is designed for dense concrete or heavy impact drilling. Check the exact product rating, shank type, and drill compatibility before choosing one.
Q
Can I use a masonry drill bit with a hammer drill?
Many masonry bits are designed for hammer drilling, but you must confirm that the bit and tool are compatible. Standard straight-shank masonry bits may fit a suitable chuck, while rotary hammers often use SDS-Plus or SDS-Max shanks. Never force an incompatible shank into a tool holder.
Q
Why does my masonry drill bit get hot?
Heat can come from excessive pressure, an unsuitable speed, a worn tip, poor dust removal, or a mismatch between the bit and the material. Stop the drill and let the bit cool before inspecting it. Follow the manufacturer’s instructions for speed, pressure, and any required cooling method.
Q
How do I identify the size of a masonry drill bit?
Check for a diameter marking on the shaft, case, or packaging. If no marking is visible, use a suitable measuring tool to measure the cutting diameter, taking care not to touch a sharp or damaged edge. For masonry anchors, follow the specified hole diameter rather than estimating from the fastener’s outside size.
✦ Wrapping Up
Conclusion
The easiest way to tell a masonry drill bit is to inspect its cutting tip. A common model has a broad, hard, chisel-like head, often made with a carbide insert, and spiral flutes that help clear dust. Wood bits often have a sharp center point, while common metal twist bits have a pointed cutting tip with defined cutting lips.
Visual clues are useful, but the manufacturer’s label is the best way to confirm an unfamiliar bit. Match the bit to the material, hole size, and drill type before you start. If the bit is damaged or its purpose remains unclear, choose a verified replacement rather than taking a chance on the wall or the tool.
💡 Key Takeaway
Before your next home improvement project, inspect the tip, check the markings, confirm drill compatibility, and verify the required hole size. Then check for hidden wires and pipes and use suitable eye protection and dust controls before drilling.
Learn how do you measure a chainsaw bar with simple steps. Find the correct bar length, avoid sizing mistakes, and choose compatible replacement parts.
Most of the pain comes from vague listings. Finding a 21v cordless drill set that actually includes what you need can mean sorting through different battery…
Two cheap, mismatched tools can slow down even the simplest weekend job. Finding the right impact wrench and drill set starts with checking the chuck sizes,…