To measure a chainsaw chain, identify its pitch, gauge, and drive link count. These three measurements help you find a replacement chain that fits your chainsaw and guide bar.
Whether you use a chainsaw to cut firewood in Pennsylvania, clear fallen trees after a storm in Texas, or maintain trees on a property in Oregon, choosing the correct chain size matters. A chain that does not fit can cause poor cutting, extra wear, or a dangerous operating condition. Fortunately, measuring a chainsaw chain is a simple task when you know which parts to check.
The three main measurements are chain pitch, chain gauge, and drive link count. Pitch describes the spacing of the chain rivets. Gauge describes the thickness of the lower drive links. Drive link count tells you the number of links that travel through the guide bar and around the sprockets.
You do not need to measure the full chain length with a tape measure. In most cases, you can identify the correct size from markings on the old chain, the guide bar, or the chainsaw manual. If those markings are missing, you can use a ruler, a caliper, and a careful link count to find the information you need.
This guide explains how to measure each part, how to read common chain size markings, and how to avoid buying the wrong replacement. It also covers what to do if your old chain is damaged, worn, or missing.
Why You Need To Measure A Chainsaw Chain
Measuring a chainsaw chain helps you find a replacement that fits the saw. It also helps you check whether an existing chain matches the guide bar and drive sprocket. Even a chain that looks close to the correct size may not fit properly.
A chainsaw chain moves around the guide bar at high speed. Its drive links sit inside the bar groove, while the drive sprocket pulls the chain around the powerhead. The nose sprocket, if fitted, guides the chain at the far end of the bar.
Each part must work with the others. An incorrect pitch can prevent proper engagement with the sprockets. An incorrect gauge can cause the chain to sit poorly in the bar groove. An incorrect drive link count can make the chain too tight or too loose.
Correct fit
The chain must match the guide bar and sprocket specifications for your exact chainsaw.
Safe operation
A correctly sized chain helps reduce problems linked to poor fit, abnormal movement, and incorrect tension.
Better maintenance
Knowing the chain size makes it easier to order replacements and keep a spare chain ready.
Less wasted money
Checking the measurements before buying helps prevent ordering an incompatible chain.
What Happens If You Use The Wrong Chain Size?
A chain with the wrong pitch may not engage correctly with the drive sprocket. This can cause poor movement, unusual noise, and damage to the chain or sprocket.
A chain with the wrong gauge may not sit correctly in the guide bar groove. It may bind, move poorly, or fail to receive proper support from the bar rails.
A chain with the wrong drive link count may not have enough adjustment range. It could be too tight to install or too loose to tension correctly. Never force a chain onto a saw to make it fit.
Wrong pitch
The chain and sprocket do not match.
Wrong gauge
The drive links do not fit the guide bar groove correctly.
Wrong link count
The chain cannot achieve the correct fit and tension.
The Three Measurements You Need To Know
Before measuring your chainsaw chain, learn the difference between pitch, gauge, and drive link count. These terms describe separate features, and you cannot use one measurement as a substitute for another.
Think of the chain as a small moving track. Pitch describes the spacing of its joints, gauge describes the thickness of the lower links, and drive link count describes how many lower links make up the complete loop.
Pitch
The distance between any three consecutive chain rivet centers divided by two.
Gauge
The thickness of the lower drive link that fits into the guide bar groove.
Drive link count
The total number of lower drive links around the complete chain loop.
Understanding Chainsaw Chain Pitch
Pitch describes the size and spacing of the chain. It is calculated by measuring from the center of one rivet to the center of the next, across three consecutive rivets, and dividing the total distance by two.
For example, if the distance between the first and third rivet centers is 0.750 inch, divide 0.750 by two. The result is 0.375 inch, which is the same as 3/8-inch pitch.
Common chainsaw chain pitches include 1/4 inch, .325 inch, 3/8 inch, and .404 inch. Some chains also use 3/8-inch low-profile pitch. Although standard 3/8-inch and 3/8-inch low-profile chains share the same nominal pitch, they are different chain systems and should not be treated as interchangeable.
1/4-inch pitch
A smaller pitch used in certain compact and specialty chainsaw systems.
.325-inch pitch
A common size used in many homeowner and professional chainsaw systems.
3/8-inch pitch
A common chain size used in many medium and larger chainsaws.
.404-inch pitch
A larger pitch used in certain heavy-duty and professional cutting systems.
Understanding Chainsaw Chain Gauge
Gauge refers to the thickness of the lower part of a drive link. This is the part that slides inside the groove along the guide bar. The chain gauge and guide bar groove must match.
Common chain gauges include .043 inch, .050 inch, .058 inch, and .063 inch. These sizes are also commonly shown in metric measurements as 1.1 mm, 1.3 mm, 1.5 mm, and 1.6 mm.
A gauge that is too large may not enter the bar groove correctly. A gauge that is too small may not receive the correct support. Normal wear can also change the apparent thickness of an old chain, so manufacturer markings are more reliable than measuring a badly worn link.
.043 inch
Approximately 1.1 mm.
.050 inch
Approximately 1.3 mm.
.058 inch
Approximately 1.5 mm.
.063 inch
Approximately 1.6 mm.
Understanding Drive Link Count
Drive link count is the total number of lower links on the chain. These links fit inside the guide bar groove and engage with the drive sprocket.
This number determines the chain’s required loop size. A replacement chain may have 52, 56, 60, 64, or another number of drive links, depending on the chainsaw and guide bar combination.
The drive link count is not the same as the number of cutting teeth. A chain has fewer cutters than drive links because the cutters are arranged along the loop at intervals.
Manufacturers may use different drive link counts for bars with the same advertised cutting length. The exact number depends on the bar design, mount, and chainsaw model.
Count lower links
Count the parts that travel inside the guide bar groove.
Do not count cutters
Cutting teeth are not the correct units for measuring chain length.
Check the complete loop
Count every drive link once, including the links around both ends of the chain.
Tools Needed To Measure A Chainsaw Chain
You only need a few basic tools to identify the size of a chainsaw chain. In many cases, the chain markings and chainsaw manual provide enough information without any physical measurement.
If the markings are missing or difficult to read, use simple measuring tools. A digital caliper is especially helpful when checking gauge, while a ruler or tape measure can help with pitch.
Digital or manual caliper
Use a caliper to measure the thickness of a drive link and check small distances accurately.
Ruler
Use a ruler with clear inch or millimeter markings to check the distance between rivets.
Permanent marker
Mark the first drive link when counting a complete chain loop.
Work gloves
Wear suitable protective gloves when handling an unpowered chain. The cutters can still be sharp.
Chainsaw manual
Check the manual for the approved chain pitch, gauge, bar, and drive link specifications.
Prepare The Chain Before Measuring
Turn off the chainsaw before checking the chain. For a gas chainsaw, switch off the engine and allow hot parts to cool. For a battery chainsaw, remove the battery pack. For a corded electric saw, unplug it from the power source.
If you need to remove the chain, follow the manufacturer’s instructions. Do not work near a moving chain or leave the saw connected to power while handling the cutting system.
Place the chain on a clean, flat surface. Wipe away loose dirt, sawdust, and oil so you can see the rivets and lower drive links clearly.
Disconnect power
Make sure the chainsaw cannot start while you inspect the chain.
Allow cooling
Avoid touching hot engine and cutting-system parts.
Clean the chain
Remove dirt that could hide markings or affect a measurement.
How To Measure A Chainsaw Chain Step By Step
The most reliable method is to identify the chain markings first, then confirm pitch, gauge, and drive link count. If you cannot find the markings, measure the physical chain and compare your results with the chainsaw manufacturer’s specifications.
Follow these steps in order. Do not buy a replacement until all three sizing details have been confirmed.
Step 1
Look for chain size markings on the old chain and guide bar.
Step 2
Measure chain pitch using three consecutive rivets.
Step 3
Check the thickness of the lower drive links.
Step 4
Count all drive links around the complete chain loop.
Step 5
Compare all measurements with the chainsaw manual.
Step 1: Check The Chain And Guide Bar Markings
Start by examining the old chain. Look closely at the outer surfaces of the drive links for small numbers or letters. These markings may identify the chain family, pitch, and gauge.
Next, inspect the guide bar near the area where it attaches to the chainsaw. Many guide bars have information stamped on the tail. This may include the bar length, chain pitch, gauge, or recommended drive link count.
The chainsaw operator’s manual is another useful source. It often lists the approved chain specifications for the original guide bar and may explain which replacement chain types are compatible.
Write down every marking you find. Do not assume that a number printed on a chain is the drive link count. Some chain identification systems use numbers to describe pitch and gauge.
Inspect the old chain
Look for stamped numbers on the drive links.
Inspect the guide bar
Check the bar tail for size and compatibility information.
Read the manual
Use the exact chainsaw model to confirm approved specifications.
Step 2: Measure The Chain Pitch
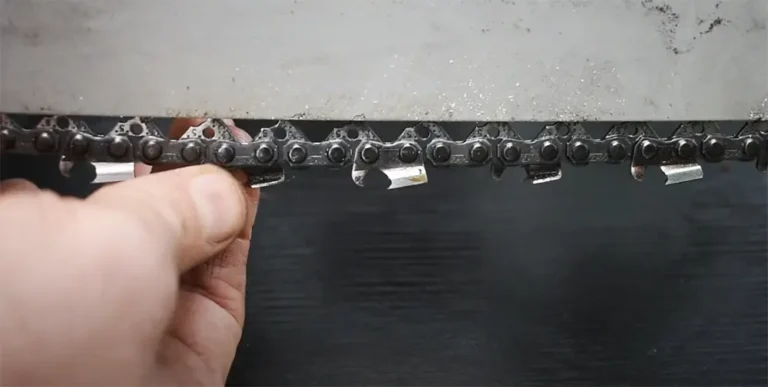
To measure pitch, locate three consecutive rivets on the chain. Rivets are the small round metal joints that hold the chain parts together. Choose three rivets in a straight section of the chain.
Measure the distance from the center of the first rivet to the center of the third rivet. Do not measure from the outside edge of one rivet to the outside edge of another.
Divide your measurement by two. The result is the chain pitch.
For example, imagine that the distance between the first and third rivet centers is 0.650 inch. Divide 0.650 by two. The result is 0.325 inch, which indicates .325-inch pitch.
Use a caliper when possible. If you use a ruler, line it up carefully with the rivet centers. A small measuring error can make it difficult to distinguish between similar chain sizes.
Find three rivets
Choose three consecutive rivet centers along a straight section.
Measure the outer centers
Measure from the center of the first rivet to the center of the third.
Divide by two
The answer is the chain pitch in inches.
Step 3: Measure The Chain Gauge
Gauge measures the thickness of the lower drive link. This is the narrow metal section that sits inside the guide bar groove, not the cutting tooth or the upper part of the chain.
Use a digital caliper to measure the thickness of the drive link at a suitable unworn area. Make sure the caliper jaws are positioned across the thickness of the link rather than along its length.
Compare the result with common gauge sizes. A reading close to 1.3 mm, for example, may indicate a nominal .050-inch gauge. However, worn links can give misleading readings, so confirm the result against the original chain markings or the guide bar specifications.
Never force a chain into the guide bar to test its gauge. A proper measurement and manufacturer specification are safer ways to establish compatibility.
Find a drive link
Identify the lower metal part that travels inside the guide bar groove.
Use a caliper
Measure the link thickness without including nearby chain parts.
Compare the reading
Check the measurement against the manufacturer’s stated gauge.
Step 4: Count The Drive Links
The drive link count determines the required chain loop length. You can find this number by counting every lower drive link around the chain.
Lay the chain flat on a clean surface. Select one drive link and mark it with a small removable marker or another clear reference. Begin counting from that point, moving around the full loop.
Count each lower drive link once. When you reach your starting point, stop. Do not count cutting teeth, tie straps, or rivets as separate drive links.
For example, if you count 56 lower drive links, the chain has a drive link count of 56. This number should match the replacement chain specification for your particular bar and saw.
Lay the chain flat
Arrange the complete loop so every lower link is easy to see.
Mark your starting point
Use a marker to avoid counting the same link twice.
Count each lower link
Continue around the full loop until you return to the mark.
Check your result
Repeat the count if you are unsure about the total.
Step 5: Confirm All Three Measurements
Once you know the pitch, gauge, and drive link count, compare them with the chainsaw manufacturer’s specifications. Check the model number and the exact guide bar fitted to your saw.
A useful record might look like this: 3/8-inch pitch, .050-inch gauge, and 56 drive links. This describes the chain’s basic sizing information, but it does not by itself prove that the chain is approved for every chainsaw using those measurements.
Check the chain type, drive sprocket, nose sprocket, bar mount, and manufacturer compatibility information before purchasing. If any detail is unclear, ask a qualified chainsaw dealer to verify the complete setup.
Pitch
Must match the drive sprocket and compatible bar nose sprocket.
Gauge
Must match the guide bar groove.
Drive links
Must match the specified chain length for the guide bar.
Common Chainsaw Chain Measurements And Sizes
Chainsaw chains are available in several pitch and gauge combinations. The table below shows common sizes used in many consumer and professional chain systems. These are general industry sizes, not a list of combinations that will fit every chainsaw.
Use the table as a reference when checking a measurement. Always confirm the exact combination with the chain and guide bar manufacturer.
Pitch
Common sizes include 1/4 inch, .325 inch, 3/8 inch, and .404 inch.
Gauge
Common sizes include .043 inch, .050 inch, .058 inch, and .063 inch.
Common Chain Pitch And Gauge Reference
The following measurements show common pitch and gauge values with their approximate metric equivalents. Not every pitch is available in every gauge, and some specialty chain systems use other specifications.
1/4-inch pitch
A small chain pitch used in selected compact and specialty applications.
.325-inch pitch
Common in several homeowner and professional chainsaw systems.
3/8-inch pitch
A widely used chain pitch in many chainsaw categories.
.404-inch pitch
Used in selected heavy-duty cutting systems.
Example Of A Complete Chain Measurement
Suppose you remove an old chain from your chainsaw and find the following measurements: .325-inch pitch, .050-inch gauge, and 64 drive links.
You would record the chain size as .325 inch x .050 inch x 64 drive links. This is a useful description when searching for a replacement. However, you must still confirm the exact chain family and chainsaw compatibility.
Two chains can share the same pitch, gauge, and drive link count but differ in cutter design, safety features, or manufacturer-specific fit. Matching the three measurements is necessary, but checking the full chain specification is also important.
Pitch
.325 inch.
Gauge
.050 inch.
Drive link count
64 links.
Final check
Confirm that the complete chain specification is approved for the saw.
How To Read Chainsaw Chain Size Numbers
Some chainsaw chains have identification numbers stamped on their drive links. These markings can help you identify the chain family, pitch, and gauge without measuring every part yourself.
For example, Oregon chain identification systems use number codes such as 72 and 91 for particular chain specifications. The numbers do not mean that the chain has 72 or 91 drive links.
The remaining letters in a chain code may describe the cutter type, chain design, or other features. Different manufacturers may use different numbering systems, so do not assume that one brand’s code means the same thing as another brand’s code.
Find the stamped code
Look at the drive links and record the complete number and letter combination.
Identify the manufacturer
Use the manufacturer’s official identification chart.
Check the complete specification
Confirm pitch, gauge, drive link count, and compatibility.
Where Can You Find Chain Size Information?
The old chain is often the first place to check. Look for small stamped numbers on the drive links. If the chain is heavily worn or dirty, clean it carefully before inspecting the markings.
The guide bar may have a size code near its mounting end. The operator’s manual may also list the correct chain specifications for the original bar.
The chainsaw itself may carry information on the drive sprocket or clutch drum. Some models identify the pitch in this area. Follow the manufacturer’s instructions before removing any covers or inspecting internal components.
Old chain
Check the stamped identification code.
Guide bar
Inspect the tail for pitch, gauge, and chain information.
Operator’s manual
Check the chain specifications for the exact saw model.
Drive sprocket
Check for pitch markings where the manufacturer provides them.
Does Chainsaw Bar Length Tell You The Chain Size?
No. Guide bar length alone does not tell you the exact chainsaw chain size. It gives you useful information, but you still need the correct pitch, gauge, and drive link count.
The advertised bar length usually refers to the cutting length, also called the called length. This is measured from the front of the chainsaw body to the tip of the guide bar. It is not the same as the bar’s full physical length.
For example, two chainsaws may both have a 16-inch guide bar but use different chain designs or drive link counts. The bar construction, mounting position, and sprocket arrangement can affect the required chain.
Never assume that a 16-inch bar always needs the same chain. Check the markings on the actual bar and confirm the information with the chainsaw manufacturer.
Called length
The advertised cutting length of the guide bar.
Overall length
The full physical measurement of the bar from end to end.
Drive link count
The actual number used to identify the required chain loop length.
Why Two Bars Of The Same Length May Need Different Chains
Guide bars can have different tail designs, mounting positions, and nose constructions. These differences can affect the chain length needed for the complete cutting system.
A bar from one manufacturer may require a different drive link count from a bar of the same called length made by another manufacturer. The correct number must come from the actual bar specification.
If you have changed the original guide bar, do not rely only on the chainsaw model’s original chain information. Check the replacement bar’s own specifications as well.
Different bar designs
The physical layout can affect the required drive link count.
Replacement bars
A non-original bar may have different chain requirements.
Changed cutting systems
A modified setup needs fresh compatibility checks.
Common Mistakes When Measuring A Chainsaw Chain
Small measurement mistakes can lead to the wrong replacement chain. Most problems happen when someone measures the wrong part, confuses chain length with bar length, or relies on an incomplete size code.
Take your time and check each measurement separately. If a result does not match the manufacturer’s information, stop and investigate before installing the chain.
Measuring the full loop with a tape
The physical loop measurement is not the standard way to identify replacement chain length. Count drive links instead.
Counting cutting teeth
Cutters are not drive links. Count the lower links that fit inside the guide bar groove.
Confusing pitch with gauge
Pitch describes rivet spacing, while gauge describes drive link thickness.
Guessing from bar length
A guide bar’s called length does not provide the exact drive link count.
Using a worn chain as the only reference
Wear can affect physical measurements, especially gauge. Confirm the original specifications.
Ignoring the drive sprocket
The chain pitch must match the drive sprocket and the compatible bar nose sprocket.
How To Avoid Measurement Errors
Use the correct reference points for every measurement. For pitch, measure between the centers of the first and third rivets. For gauge, measure the lower drive link. For chain length, count the complete set of drive links.
Write down the results instead of trying to remember them. A simple note with three measurements can prevent confusion when comparing replacement chains.
If the old chain has damaged links, missing parts, or badly worn drive links, do not rely on it alone. Use the guide bar markings and the manufacturer’s parts information to identify the correct chain.
Measure twice
Repeat uncertain measurements before deciding on a chain size.
Use the right tools
A caliper is better suited to small thickness measurements than a flexible tape.
Verify compatibility
Compare your measurements with the exact chainsaw and guide bar specifications.
What To Do If You Cannot Measure Your Old Chainsaw Chain
You can still find the correct chain if the old chain is missing, broken, or too worn to measure. The best approach is to identify the chainsaw model and the guide bar specifications.
Start with the brand and exact model number. Then check whether the guide bar is the original part or a replacement. Use the model information and bar identification code to find the correct chain specifications.
If the bar markings are unreadable, contact an authorized dealer or qualified chainsaw service center. Provide the saw model and any information you can find on the guide bar. A professional can help identify the correct cutting system.
Find the chainsaw model
Check the model label on the powerhead.
Identify the guide bar
Look for a brand, part number, and size information.
Check official parts information
Use the manufacturer’s replacement parts guide.
Ask a qualified dealer
Request help when the bar or chain specifications remain uncertain.
Can You Use A Different Brand Of Chainsaw Chain?
A replacement chain does not always need to come from the same brand as the chainsaw. Some manufacturers offer compatible chains for multiple saw brands and models.
However, the replacement must meet the exact specifications for the cutting system. Check pitch, gauge, drive link count, cutter design, and any manufacturer compatibility requirements.
A chain that matches three basic measurements is not automatically approved for every saw. Confirm compatibility before using a chain from another brand.
Check the specifications
Confirm all required measurements and the chain family.
Check manufacturer approval
Make sure the replacement is listed as compatible with your bar and saw.
Avoid forced installation
Never modify or force a chain to fit an incompatible cutting system.
Safety Checks After Measuring And Installing A Chainsaw Chain
Correct measurements are only the first part of a safe replacement. After installing a new chain, follow the chainsaw manufacturer’s instructions for chain direction, tension, lubrication, and initial inspection.
A correctly sized chain can still be unsafe if it is installed backward, tensioned incorrectly, or used with a damaged guide bar. Never start the saw until the cutting system has passed the required checks.
Check chain direction
Make sure the cutting teeth face the correct direction along the top of the guide bar.
Check chain tension
Follow the exact tensioning method in the operator’s manual.
Check lubrication
Confirm the chain oil system works as specified.
Inspect the guide bar
Look for damaged rails, unusual wear, or other defects.
Check the chain brake
Make sure the safety system works according to the manufacturer’s instructions.
Signs That The Chain Does Not Fit Correctly
A chain that does not fit correctly may be difficult to install, may not move freely by hand when properly released and unpowered, or may fail to reach the specified tension. These are reasons to stop and recheck the setup.
Do not use the chainsaw if the chain binds, jumps off the bar, has damaged drive links, or cannot be adjusted as directed. A chain that repeatedly becomes loose may also point to a worn chain, damaged bar, or another mechanical problem.
If you cannot find the cause, have the chainsaw inspected by a qualified service technician. Do not attempt to correct a mismatch by grinding drive links or altering the guide bar.
Chain will not fit
Recheck pitch, gauge, drive link count, and guide bar compatibility.
Chain is too tight
Check the drive link count and the tensioning system.
Chain is too loose
Check the chain size, wear, and guide bar condition.
Chain moves poorly
Stop operation and inspect the cutting system for incorrect fit or damage.
How To Keep Your Chainsaw Chain In Good Condition
Regular chain care helps maintain cutting performance and makes future measurements easier. A clean chain is also easier to inspect for damage and worn drive links.
After each use, follow the manufacturer’s cleaning and maintenance instructions. Remove accumulated sawdust and debris, inspect the chain, and check the guide bar and lubrication system.
Keep the chain properly sharpened and tensioned. A dull chain can cut poorly and place extra strain on the saw. A chain that is too tight can increase wear, while one that is too loose may come off the bar.
Clean after use
Remove debris and inspect the chain for damage.
Maintain sharp cutters
Use the correct file size and sharpening angles specified for your chain.
Check tension
Inspect chain tension before use and follow the manual’s adjustment procedure.
Check chain oil
Use the specified chain lubricant and verify that the lubrication system operates.
Replace damaged parts
Do not continue using a chain with cracked, damaged, or excessively worn components.
When Should You Replace A Chainsaw Chain?
Replace a chainsaw chain when its cutters reach the manufacturer’s wear limit, when the drive links or connecting parts are damaged, or when the chain cannot be maintained safely.
Other warning signs include cracked links, damaged rivets, excessive wear, and repeated problems with proper tension. A chain that produces unusually fine dust instead of normal wood chips may be dull, although other cutting problems can produce similar symptoms.
Do not judge chain condition by appearance alone. Follow the chain manufacturer’s wear indicators and replacement guidance. If you are unsure whether the chain is safe to use, have it inspected by a qualified technician.
Damaged drive links
Replace the chain if the lower links are cracked or damaged.
Excessive wear
Follow the manufacturer’s limits for cutter and drive link wear.
Damaged rivets
Do not operate a chain with loose, cracked, or damaged connections.
Repeated tension problems
Inspect the chain and cutting system before continuing to use the saw.
Research And Editorial Gap Map
The main reader task is identifying the correct replacement chainsaw chain. Manufacturer guidance from Oregon and Husqvarna establishes the key sizing details: pitch, gauge, and drive link count.
The reviewed manufacturer resources explain chain identification and replacement, but a reader may still need a clear sequence for measuring an unmarked chain. This guide adds a practical measurement method, a worked pitch calculation, a separate gauge explanation, and a complete drive link counting procedure.
The following gap map distinguishes questions supported by the inspected manufacturer pages from useful next needs inferred from the measurement task. These are editorial findings from the reviewed material, not claims about search volume or the whole internet.
Question: How do I measure pitch?
Reader stage: During measurement. Basis: Documented manufacturer guidance. Reviewed coverage: Answered. Reader benefit: A clear three-rivet method with a calculation. Priority: High.
Question: How do I count drive links?
Reader stage: During measurement. Basis: Documented manufacturer guidance. Reviewed coverage: Answered. Reader benefit: A clear counting method that avoids confusing cutters with lower links. Priority: High.
Question: Can I use bar length to find chain length?
Reader stage: Before purchasing. Basis: Inferred next need. Reviewed coverage: Answered in manufacturer guidance. Reader benefit: Explains why called length and drive link count are different. Priority: High.
Question: What if the old chain is missing?
Reader stage: Before purchasing. Basis: Inferred next need. Reviewed coverage: Not fully checked across all inspected pages. Reader benefit: Gives a model and guide bar identification route. Priority: Medium.
Question: Can I use another brand?
Reader stage: Replacement selection. Basis: Inferred next need. Reviewed coverage: Not fully checked. Reader benefit: Explains why matching basic measurements is necessary but not sufficient. Priority: Medium.
Question: What if the chain does not fit?
Reader stage: After installation. Basis: Inferred next need. Reviewed coverage: Shallow in the measurement pages. Reader benefit: Provides safe troubleshooting steps and a clear stop-use boundary. Priority: High.
Frequently Asked Questions
Q
How do I know what size chainsaw chain I need?
You need to identify three measurements: pitch, gauge, and drive link count. Check the markings on your old chain and guide bar, then confirm the information in your chainsaw manual.
Also verify the chain family and compatibility with the drive sprocket and guide bar. Do not select a replacement based on bar length alone.
Q
Can I measure a chainsaw chain with a tape measure?
A tape measure can help you estimate the distance between rivets, but it is not the best tool for small chain measurements. A ruler or caliper provides better control when measuring pitch.
You should count drive links to determine chain length rather than measuring the complete loop with a tape. Use a caliper for gauge when possible.
Q
How do I measure chainsaw chain pitch without a gauge tool?
You can use a ruler or caliper. Measure from the center of the first rivet to the center of the third consecutive rivet, then divide the result by two.
For example, a distance of 0.750 inch between the first and third rivet centers gives a pitch of 0.375 inch, or 3/8 inch. Confirm the result with the chain markings or manufacturer specifications.
Q
Is chainsaw chain length measured in inches?
Chainsaw guide bars are commonly sold by their called cutting length in inches. However, replacement chain length is normally identified by the number of drive links rather than the full loop measurement in inches.
For example, a chain may have 56 drive links. The correct number depends on the actual guide bar and chainsaw combination.
Q
What is the difference between chainsaw chain pitch and gauge?
Pitch measures the spacing of the chain rivets. It is calculated using the distance between the centers of three consecutive rivets divided by two.
Gauge measures the thickness of the lower drive links that sit inside the guide bar groove. Both measurements must match the cutting system specifications.
Q
Can two chainsaw chains have the same pitch but different sizes?
Yes. Two chains can have the same pitch but different gauges and drive link counts. They may also have different cutter designs and other chain features.
That is why pitch alone is not enough to identify a replacement. Check all three main measurements and confirm the complete chain specification.
Q
How many drive links does a 16-inch chainsaw chain have?
There is no single drive link count for every 16-inch chainsaw bar. The number depends on the guide bar design, chainsaw model, mounting position, and chain system.
Check the number stamped on the actual guide bar or consult the manufacturer’s replacement parts information. Do not assume that every 16-inch bar uses the same number of links.
Q
Can I use a chain with the wrong gauge if it almost fits?
No. The chain gauge must match the guide bar groove. A chain that almost fits may not receive the correct support or move safely through the cutting system.
Never force an incorrect chain into the bar. Check the specifications and obtain the correct replacement before using the chainsaw.
Q
Does a new chainsaw chain stretch?
A new chain can develop some initial looseness as its components settle during use. This is often described as chain stretch, although wear and movement at the joints also play a role.
Check and adjust tension as directed in the operator’s manual. Allow the chain to cool before making adjustments when the manufacturer’s procedure requires it.
Q
Can I shorten a chainsaw chain to make it fit?
Do not shorten a chain simply to make an incompatible chain fit your guide bar. Changing chain length requires the correct equipment, parts, and joining procedure.
An incorrectly assembled chain can fail during operation. Use a replacement chain with the correct drive link count, or have chain repair completed by a qualified professional when the manufacturer permits it.
✦ Wrapping Up
Conclusion
Learning how to measure a chainsaw chain is easier when you focus on its three main measurements: pitch, gauge, and drive link count. Pitch tells you the spacing of the rivets, gauge tells you the thickness of the lower drive links, and drive link count tells you the required chain loop length.
Start by checking the markings on the old chain and guide bar. If those markings are missing, measure the pitch with three consecutive rivets, check the drive link thickness with a caliper, and count every lower drive link around the complete loop.
Before buying a replacement, compare all three measurements with the exact chainsaw and guide bar specifications. Also check the drive sprocket, compatible nose sprocket, and approved chain type. A correct fit is more important than choosing a chain based on appearance or advertised bar length.
Take a few minutes to record your chain size. Keeping the information with your chainsaw manual can make future replacements easier and help you avoid buying the wrong chain.
💡 Key Takeaway
Write down your chainsaw chain’s pitch, gauge, and total drive link count. Verify all three against your exact guide bar and chainsaw manual before ordering a replacement. Never operate a chain that does not fit or cannot be tensioned correctly.
A tap and drill set should save you time, but picking the wrong one means fighting unfamiliar sizing or a confusing layout. I’ve narrowed the field to five…