How to sharpen a drill bit on a bench grinder
You've got a dull drill bit, a bench grinder on the bench, and twenty minutes to spare. Knowing how to sharpen a drill bit on a bench grinder really comes down to one thing: setting the work-rest height so the wheel carves the correct 118-degree lip angle into the bit's web. Everything else is just gentle, repeated touches and a top-down check.
A standard HSS twist drill runs at 118 degrees total point angle, or 59 degrees per lip. Per the OSHA grinding-wheel standard (29 CFR 1910.215), the gap between your work rest and the wheel face must stay at 1/8 inch or less. Get that setup right and the bit takes two to three minutes to sharpen.
Get it wrong and you walk away with a crooked, oval-cutting mess.
Quick Answer
Set the work rest height to lock in your 118-degree point angle. Center the bit's web flat on the rest. Rock it gently against the wheel in two to three light passes.
Flip 180 degrees and repeat on the opposite lip. Check top-down symmetry between passes.
Why "Touching the Bit to the Wheel" Won't Give You a Good Point
Here's the trap most beginners fall into. You see a video where someone waves the bit around on the wheel and gets a "good enough" point. You try it at home and your bit cuts a wobbly, oval hole in pine.
What happened? You never had a fixed reference for the angle.
The grinding wheel is a flat, spinning disc. The bit's lip angle depends entirely on where along that disc's face the cutting edge meets it. If your work rest sits at the wheel's centerline, you get a 90-degree point.
Raise the rest a bit and the angle opens toward 118 or 135 degrees. No rest height set, no fixed geometry. You're just hoping.
This is a spatial problem, not a "technique" problem. You need to see the relationship between three things: the wheel face, the rest surface, and the bit's web sitting on that surface. A quick sketch of those three in profile makes it click.
Without that visual anchor, a numbered list of steps reads like a recipe for soup.
As of 2026, most home grinders still ship with a plain, unmarked work rest. There's no degree scale on the knob. The practical workflow: set the rest by eye to "slightly above center," grind one lip, do a top-down check, adjust the rest, and re-grind.
Two bits per session while the habit locks in.
Read Your Bit's Anatomy Before You Pick It Up
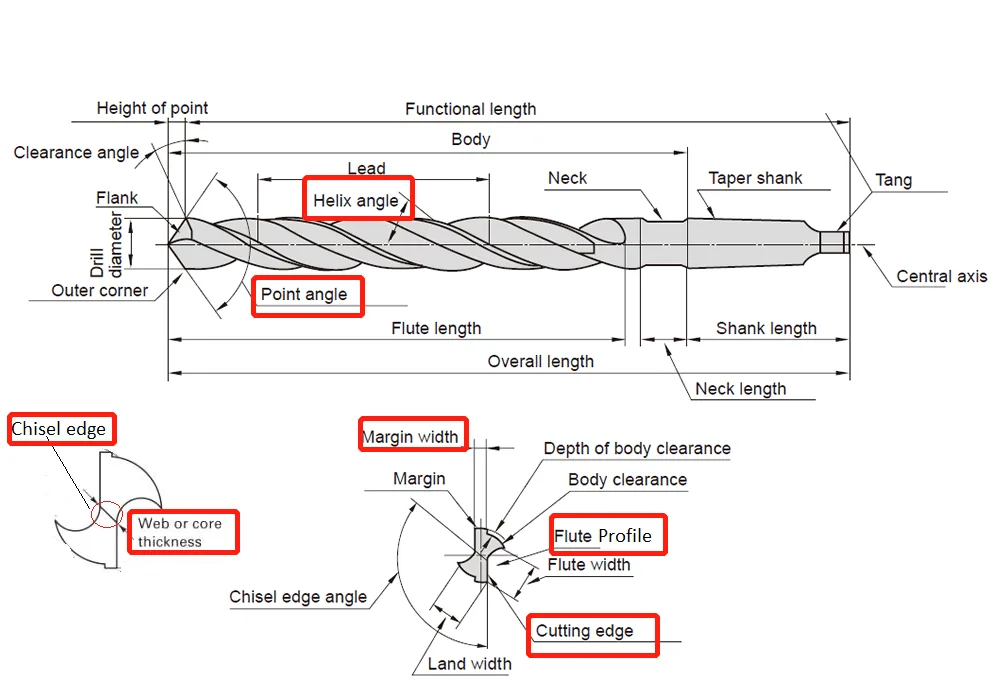
You don't need a metallurgy degree, but you do need to know which face of the bit touches the wheel and which does not.
| Part | What It Is | What You Do With It |
|---|---|---|
| Web | The flat land between the two flutes | Sits flat on the work rest. This is your reference plane. |
| Lip (cutting edge) | The sharpened edge where the web meets each flute | Gets ground. Two lips, one per side. |
| Chisel edge | The tiny point at the very center of the tip | Gets a whisper-light touch to open it. Never dwell. |
| Flutes | The helical channels that carry chips out | Never touch the wheel. Grind these and the bit stops clearing chips. |
| Shank | The round or hex end that holds in a chuck | Deburr lightly. Never grind the shank into an oval. |
The rule that keeps bits alive: you grind the top of the web, not the sides of the flutes. Run a fingernail across the cutting edge. If it catches, the bit is still sharp.
If it slides off smoothly, it's time to grind.
Bits under about 3/16 inch are short and stubby on the rest and they wobble. A hand-held 118-degree dial sharpener handles those in 30 seconds. Save the grinder for 3/16 inch and up.
Setting Up the Grinder: Dressing, Wheel Choice, and Work-Rest Height
Dress the wheel face
A grinding wheel isn't a fixed object. The same swarf (metal dust) that sharpens your bit also loads up the wheel's face and makes it glaze over. A glazed wheel stops cutting and starts sliding, and your bit heats up fast.
Take a diamond dressing rod. With the wheel spinning, touch the rod lightly to the face at three or four points to expose fresh abrasive crystals. Do this once a month, or whenever the wheel feels smooth and glassy instead of gritty.
Pick the right wheel material for your bit
Not every wheel works for every bit material:
| Bit material | Wheel to use | Why |
|---|---|---|
| Standard HSS (M2, M35) | Aluminum oxide, brown, 46 to 120 grit | Cuts steel cleanly, cheap, widely available |
| Cobalt (M42) | Silicon carbide, green | Harder abrasive; Al2O3 clogs on cobalt |
| Carbide-tipped masonry | CBN (cubic boron nitride) | SiC will glaze on tungsten carbide |
| TiN-coated HSS | Aluminum oxide, 80 grit | Remove the TiN layer first, then grind the steel beneath |
Most home grinders come with a single brown Al2O3 wheel. That covers 90 percent of what a DIYer or woodworker will throw at it. If you grind masonry bits regularly, a green SiC or CBN wheel is a $25 to $45 upgrade.
Lock the work-rest height: this is where your angle comes from
Set the rest so its top surface sits just above the wheel's centerline for a 118-degree point. For 135-degree masonry bits, raise it a touch more. For a 90-degree brad-point in hardwood, bring it down to exactly the centerline.
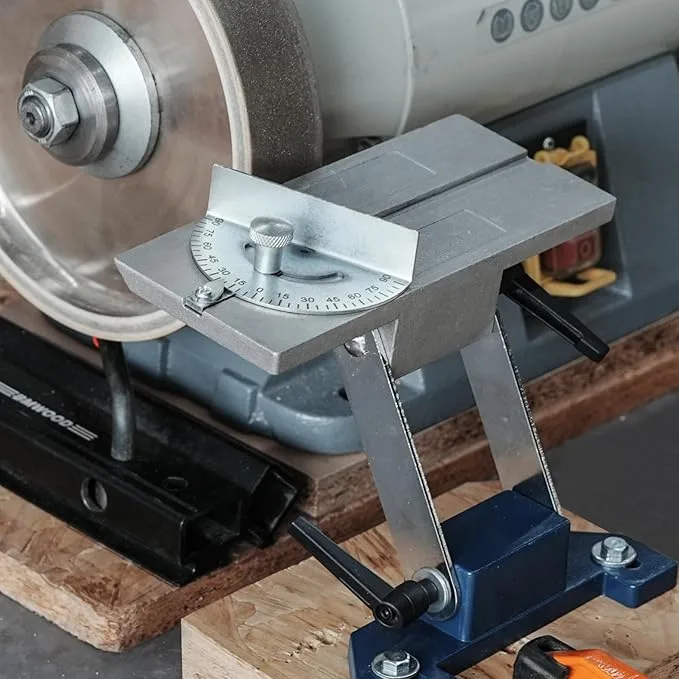
The gap between the rest face and the wheel must be 1/8 inch (3 mm) or less, per ANSI B71.2. If the gap is wider, the bit can wedge between rest and wheel and get pulled into the face. That's a broken bit and a possible eye injury.
Lock the set-screw. Tap the rest with a finger. It should not move.
If it shifts, the angle you set is gone and you're back to guessing.
The Grind: Centering, Rocking Passes, and Quenching
Center the bit on the rest
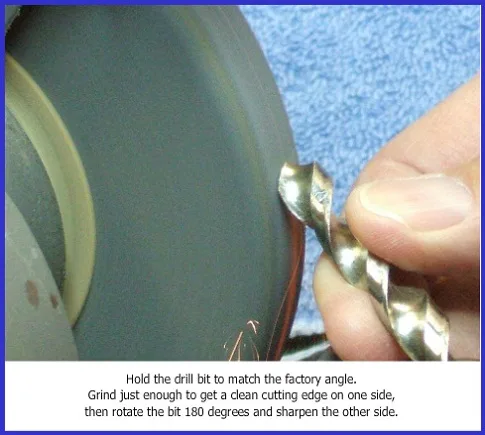
Lay the bit's web flat on the rest surface. The shank hangs over the near edge of the rest. The bit sits square to the wheel face, not canted left or right.
If the bit is tilted, you're grinding one lip at a different angle than the other, and symmetry is dead before you start.
For bits 3/16 inch and up, hold the shank in your non-dominant hand and let the web do the work. For anything smaller, use needle-nose pliers to grip the shank.
The rocking motion (not a press)
You do not press the bit into the wheel. You rock it.
Bring the web's top edge to the wheel and hold it for about one second. Rock the bit two to three degrees side to side, like you're polishing a lens. That's one pass.
Two to four passes per lip on a dull bit, six to eight on one with a rounded radius.
The rocking spreads contact across the whole lip instead of digging one deep notch. It also keeps the bit cooler because the metal isn't sitting in one spot.
Quench between passes
After every two or three passes on one lip, dip the bit's point into clean water for three to five seconds. You're keeping the HSS below about 500 degrees Fahrenheit, where the temper starts to soften. A blue or straw-colored tint means the bit is cooked.
You cannot reverse that.
Keep a small heat-safe mug of water next to the grinder. You'll use it more than you think.
Open the chisel edge: just a whisper
The chisel edge is the tiny point right at the center of the tip. If it's blunt or too long, the bit wanders when it starts a new hole.
To open it, take one very light, brief touch of the top center point against the wheel. Maybe half a second. You're removing a shaving of metal, not reshaping the lips.
If you dwell, you'll round off the chisel edge and the bit will walk on every new hole.
After all four lips and the chisel edge are done, run a light pass on the shank's end face to knock off the burr. This keeps your hands from getting nicked when you pull the bit from the chuck.
The Top-Down Symmetry Check: Your Visual Quality Gate
This is the step that separates a 40-cent grind from a $3 replacement bit.
Turn the bit so you're looking straight down its axis. The tip points at you. Now look at the two lips.
They must be equal in length and angle. One lip a fraction of a millimeter longer means the bit pulls to one side the moment it breaks into wood. You get oval, wandering holes, and the bit binds in tighter materials.
Here's the workflow:
- After finishing the first lip, stop and look down the axis. Note which side looks longer or steeper.
- Do one or two extra rocking passes on the shorter, steeper side.
- Look again. Repeat until both lips read the same.
- If one lip is visibly longer, you ground the other side too much. You can't add metal back. That bit is done.
In natural side-light, both lips should cast matching shadows. If one shadow is thicker or shorter, keep working. This five-second check is the highest-leverage habit in the whole process, and it's the one step most people skip.
Six Visual Mistakes That Cook a Bit in Under a Minute
Most of the damage you can do at the wheel is visible if you pause and look. Here are the six that actually show up in the field:
- Grinding the flutes, not the web. You rotate the bit 90 degrees and the helical channel meets the wheel. One pass and your chip-clearing channel is scarred. The bit drills slower and binds in hardwood.
- Asymmetric lips. One side gets four passes, the other gets two. Your top-down check catches this. Skip the check and the bit pulls left or right on every hole.
- Chisel edge gone. You dwelled on the center point for a full second instead of a half-second touch. The bit now has a rounded nose and wanders off-center on new holes.
- Blue or straw heat tint. The temper is gone. The HSS has annealed locally and is now as soft as spring steel. The lip will not scratch glass. That bit is done.
- Shank hit the wheel. The round shank is now a flat oval. It will not seat in a collet or key chuck.
- No top-down check between passes. You grind, flip, grind, flip, and only look at the end. By then the asymmetry is baked in and you've removed more metal than you needed to.
Each of these is a two-second visual habit. Train the eye and the bit lives five to ten more sharpening cycles.
Point-Angle Cheat Sheet: 118, 135, and 90 Degrees
The angle you set on the work rest determines the bit's job:
| Point angle | Per-lip angle | Best for | Work-rest position |
|---|---|---|---|
| 118 deg | 59 deg | General wood, steel, plastic (standard HSS twist) | Slightly above wheel centerline |
| 135 deg | 67.5 deg | Masonry, concrete (carbide or cobalt bit) | Noticeably above centerline |
| 90 deg | 45 deg | Brad-point in hardwood, dense composites | Exactly at wheel centerline |
If you don't know which angle your bit left the factory with, check the packaging or the bit's collar stamp. Most standard twist drills are 118. Masonry bits are 135.
A 90-degree brad-point is the exception, not the rule.
A practical tip: mark your work rest with a permanent marker at each of the three heights after you dial them in. Next session, you just slide the rest to the mark and start grinding. No re-guessing.
When the Bench Grinder Is Not the Right Tool
The grinder is a blunt instrument, and there are cases where it actively makes things worse:
- Bits under 3/16 inch. The shank is too short to center on the rest. The bit wobbles and you grind the flutes by accident. A handheld 118-degree dial sharpener handles these in 30 seconds.
- Carbide-tipped masonry bits on an Al2O3 wheel. The wheel glazes, the carbide tip slides, and you heat the steel body without sharpening the tip. You need a CBN wheel. If you don't own one, take the bit to a masonry shop.
- High-precision through-holes in metal. A lathe with a single-point tool and a steady rest holds 118 degrees to within a degree. The grinder holds it to maybe two or three. Fine for a one-off home project, not for a batch of 200 steel parts.
- A bit with a heavy radius or broken tip. If more than a millimeter of the lip is gone, the grinder's arc makes the angle drift. A lathe grind gives you a straighter, more predictable cut.
Rule of thumb: if the bit is 3/16 inch or larger, standard HSS, and you just need a routine touch-up, the grinder is the fastest, cheapest tool you own. Anything outside that box, use the right tool for the job.
Safety Rules That Actually Matter at the Wheel
You already set the work-rest gap to 1/8 inch. Here is the rest of the non-negotiable list:
- Face shield over safety glasses. Wheel fragments erupt in a cone, not just sideways. Glasses alone will not stop a 3600 RPM ceramic shard.
- No gloves, no long sleeves, no dangling jewelry. A loose cuff caught between the rest and the wheel will drag your hand in.
- Inspect the wheel before every session. Look for hairline cracks under light. Check that the max-RPM stamp is at or above your grinder's speed. A cracked wheel at 3600 RPM is a shrapnel event.
- GFCI or RCD on the circuit. The grinder is a heavy cast-iron machine with a wet quench cup nearby. A portable 30 mA RCD plug costs $12 and covers you if the garage outlet lacks one.
- Quench with clean water, not swarf slurry. A muddy quench re-deposits abrasive grit on the bit's hot surface.
- Let the wheel stop before reaching over the top. The spinning face is the most dangerous zone on the grinder. Use a tool, or wait three seconds.
These mirror the requirements in ANSI B71.2 for grinding equipment. In a commercial shop they are enforceable. In your garage, they are just how you keep both eyes.
"I Grinded It and the Holes Are Still Oval": Troubleshooting
If the bit cuts a round hole after your grind, you're done. If it does not, here is where to look:
Oval or wandering holes. Your lips are asymmetric. Go back to the top-down check and equalize by removing more from the longer side. If the gap is too large to fix, the bit is past its last sharpening cycle.
Bit binds or chatters in hardwood. Your point angle is too steep for the material. A 135-degree masonry bit will grab and chatter in oak. You need 118 or 90.
Check what you actually set.
Bit will not cut at all, slides instead of biting. Two causes. Your wheel is glazed, so dress it with a diamond rod. Or the temper is cooked: run a fingernail across the lip and if it does not catch, the HSS has blueed.
Replace the bit.
Hole starts round, then goes out of round mid-depth. The chisel edge is too long or too blunt. The bit is using the center point to push instead of the lips to cut. One whisper-light touch on the center will open it.
Shank will not seat in the chuck. You ground the shank. Look at it in side light. If the profile is no longer a clean circle, the bit is finished.
None of these have a "just keep grinding" fix. Each one points to a specific, visible cause. Find the cause, fix that one thing, and re-check the top-down symmetry.
Frequently Asked Questions
Can you sharpen a drill bit without a grinding wheel?
Yes. A handheld 118-degree dial sharpener handles bits from 1/8 to 1/2 inch in about 30 seconds. It is fixed-angle, so it only works for standard twist points, not 135-degree masonry or 90-degree brad-point geometries.
How many times can you re-sharpen an HSS bit?
Five to ten sharpening cycles before the shank diameter drops below your chuck's minimum grip. After that, the bit slips under load and the point geometry no longer matters.
What do I do if the bit is already blue or straw-colored?
Nothing. The temper is gone. The HSS has locally annealed and will not re-harden at home temperatures.
A blue-tinged lip will not hold an edge on any material. Replace the bit.
Should I dress a brand-new grinding wheel before the first use?
Yes. Factory-dressed wheels often ship with a glazed face from packaging and transit. One light pass with a diamond dressing rod exposes fresh abrasive crystals and gives you a clean cutting surface from the very first grind.